How to make a lithophane from a photo
This guide was drafted with AI assistance.
Pick a high-contrast photo, convert it to a 3D relief with a free lithophane generator, and print it in white PLA at 0.1 mm layers, 100 % infill. It looks like a plain grey plate until you put a light behind it, then the photo appears. The whole thing is one upload and an overnight print.
What the generator does, and what it doesn't
Handled for you
- Maps image brightness to panel thickness, which is the whole trick, and does it per pixel
- Clamps the thickness to a range that actually prints and actually transmits light
- Adds a frame or a stand, and sizes the panel to your printer bed
Still your call
- It needs backlighting to read at all. In daylight it looks like a grey panel
- Contrast beats resolution. A dark, evenly lit portrait works; a bright busy scene does not
If the generator refused your file, the message is explained here: why was my model rejected. Almost every rejection is the same thing, a mesh with holes, and the “Fix it for me” button in the popup resolves most of them in one click.
What a lithophane actually is
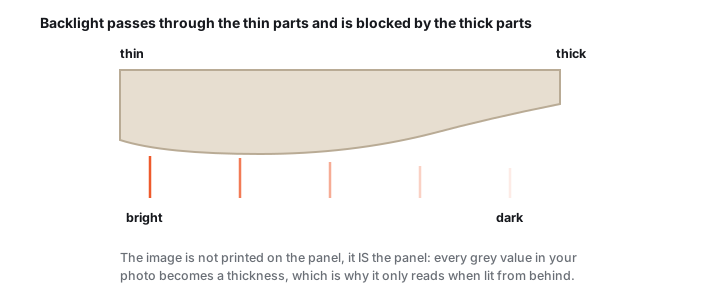
A lithophane is a thin translucent panel where the thickness carries the image. Where the photo is bright, the plastic is thin and lots of light passes through; where the photo is dark, the plastic is thick and blocks the light. Off, it looks like a featureless grey tile. Backlit, the picture snaps into view. The technique is 200 years old, it was done in porcelain, but a 3D printer makes it a ten-minute project instead of a craft you apprentice for.
Step 1: pick the right photo
| Photo | How it reads | Why |
|---|---|---|
| Dark, evenly lit portrait | Excellent | Wide brightness range across one clear subject |
| Pet against a plain wall | Excellent | Strong silhouette, nothing competing behind it |
| Bright sunny landscape | Poor | Everything is light, so there is almost no thickness range to use |
| Busy group shot | Poor | Too many small subjects; each ends up a few tenths of a millimetre |
| Bold red on green | Poor | Contrasts to the eye, nearly identical in brightness, so it vanishes |
| Logo or silhouette | Very good | Pure black and white is the easiest case there is |
Contrast beats resolution
The single biggest factor in how a lithophane turns out is the photo, not the printer. A lithophane only has brightness to work with, no color, so you want an image that already reads clearly in black and white:
A ten-second test for any photo
A quick test: desaturate the photo on your phone. If it still reads well in grayscale, it will make a good lithophane.
Step 2: generate the lithophane
Upload and set the size
Drop the photo into the free Meshcast lithophane generator. It converts the image's brightness into a printable relief right in your browser, and the file never leaves your device. Downloading needs a free account (no card). Set the panel size (a 100 mm tall flat panel is a good first print) and the thickness range, then download the STL or 3MF.
Why the thickness range matters
Thickness matters. A minimum of about 0.8 mm for the brightest areas and a maximum of about 3 mm for the darkest gives strong contrast while still letting light through. Too thin overall and it washes out; too thick and even the highlights stay dark.
Step 3: print settings that make or break it
White PLA, fine layers, solid infill
A lithophane lives or dies on print quality, because every layer line is visible when backlit. The settings below are the difference between a crisp portrait and a striped smudge:
Flat or standing up?
Printing the panel vertically (standing up) takes longer and may need a brim or small supports, but it gives noticeably better detail than printing flat. If you just want a quick first result, flat-on-the-bed works too, you'll simply see the horizontal layer lines more.
Step 4: backlight and display
Any even light source
The magic only appears with a light behind it. Good options, cheapest first: a bright window, a slim LED light panel or tracing pad, an LED photo frame, or a small light box. Use an LED tea light rather than a real flame, PLA softens with heat. Warm white light usually flatters portraits; cool white looks better for architecture and snow scenes.
Lithophane troubleshooting
It looks like a plain grey panel
Cause No backlight. A lithophane has no colour and no printed image; it is thickness, and it only reads when light passes through it.
Fix Backlight it evenly: an LED panel, a slim light box, an LED photo frame, or a bright window. Use an LED tea light rather than a flame. Warm white usually flatters portraits.
The image is muddy or you cannot tell what it is
Cause The photo, not the printer. A busy scene or a low-contrast image has nothing to convert into thickness.
Fix Desaturate the photo on your phone first. If it does not read in grayscale it will not read as a lithophane. Crop tight on one subject, and prefer a dark evenly lit portrait over a bright busy landscape.
Layer lines and banding spoil the picture
Cause Every layer line is visible when backlit, so print quality shows here far more than on a normal part.
Fix White or natural PLA, 0.10–0.12 mm layers, 100 % infill, no top or bottom light gaps, and a slow 30–40 mm/s. Stand the panel on edge: it needs a brim and takes longer, but it puts the layer lines across the image instead of along it, which reads noticeably better.
What thickness should I use?
About 0.8 mm for the brightest areas and 3 mm for the darkest.
Why those Below 0.8 mm the panel is fragile and prints unreliably; above 3 mm even bright light stops passing, so the extra range buys you nothing. Both are settable before you download.
Do colour photos work?
Yes, but only their brightness survives. The generator converts to brightness values and prints a monochrome relief.
That is worth knowing when choosing a shot: two colours that contrast strongly to the eye, like red on green, can have almost identical brightness and vanish completely.
Made by meshcast.app. Got stuck? Email a photo and I'll help you debug.