How to split an STL for printing
Upload the STL to the free Meshcast Print Splitter, pick your printer from the bed presets, hit Auto-suggest to place cut planes so every piece fits, choose dowel or hex pin connectors, and download print-ready pieces. Each one prints cut-face-down with no supports. Runs in your browser, no card.
When splitting beats scaling down
Scaling a model to fit your bed is the easy fix, and usually the wrong one. Split instead when:
- The size is the point. Cosplay helmets, wall art, life-size props and functional parts have a target dimension. A 40 cm sword hilt at 55 % scale is a toy.
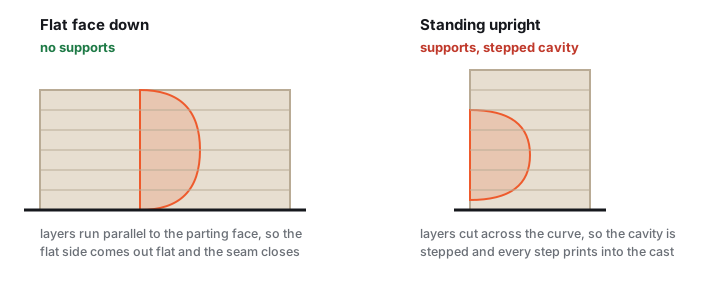
- One piece would need a support forest. Cutting at the right height lets each section print flat on its cut face, often zero supports instead of hours of scaffolding.
- A tall part is weak across layers. Splitting lets you reorient sections so layer lines run along the load instead of across it.
Split it in 5 steps
Upload and pick your printer
Drop the STL into the Print Splitter and choose your bed: presets cover the Ender 3 (220×220×250), Bambu X1/P1 (256³), A1 mini (180³), Prusa MK4, CR-10 and Voron 350, or type custom dimensions. The tool shows your model's size so you can see exactly how far over the limit it is.
Place the cut planes
Click ↻ Auto-suggest and the tool places the fewest cuts that make every piece fit your bed. Then take over: drag any colored plane directly in the 3D preview (or nudge its slider), delete cuts, or add new ones across X, Y or Z. A warning appears if any piece still doesn't fit.
Choose connectors
Three options per cut: dowel pins (round, printed separately), hex pins (twist-resistant, use these on joints that could rotate), or none for flat glue-only faces. You control pin diameter (5–14 mm), length, pins per cut (1–6) and socket clearance.
Split and inspect
Hit Split model. The exploded preview pulls the pieces apart so you can check every joint and socket; the fit list confirms each piece fits the bed you set. Not happy? Go back, move a cut, split again.
Print and assemble
Download and slice. Every piece is oriented cut-face-down, the flat cut is the first layer, so no supports for the joint itself. Pins print lying flat, which runs the layer lines along their length (the strongest direction). Dry-fit everything before any glue touches plastic.
Where to put the seams
Auto-suggest optimizes for fit; you optimize for looks. Move the planes so seams land where the eye forgives them:
- Natural edges and creases, a belt line on a figure, a panel gap on a helmet, the rim of a planter. A seam on a flat, featureless surface is the most visible kind.
- Away from fine detail, never through a face, text or thin features that must line up perfectly.
- Out of sight, the back or underside of a display piece hides a multitude of sins.
Gluing the pieces
| Material | Best glue | Notes |
|---|---|---|
| PLA | Cyanoacrylate (super glue) | Bonds in seconds; rough faces with 220-grit first |
| PETG | Gel CA or 5-min epoxy | Epoxy also fills small seam gaps |
| Any, large joints | Epoxy | Longer open time to align big pieces |
Insert the pins, dry-fit, then glue one joint at a time. For invisible seams afterwards: fill with more CA plus baking soda (or filler primer), sand, paint. Not sure which filament to print in? See the filament comparison.
Splitting troubleshooting
The pins are too tight, or too loose
Too tight Sand the pin, or run a drill bit through the socket. Do this before gluing anything; a forced pin splits the socket wall.
Too loose Glue fixes it. A loose pin still aligns the parts, which is its actual job.
Next time Adjust socket clearance. 0.25 mm suits most FDM printers; go up if yours prints tight, down if it prints loose.
Which glue?
PLA Cyanoacrylate (super glue). It bonds in seconds and the joint is stronger than the layer lines around it.
PETG Gel CA, or 5-minute epoxy. Epoxy also fills small seam gaps, which CA will not.
Both Rough both faces with 220 grit first. A shiny cut face is the worst possible gluing surface.
Do the pieces need supports?
No. Each piece is oriented cut-face-down, so the flat cut becomes the first layer and prints support-free.
The pins too They print lying flat, which also runs the layer lines along their length rather than across it, and that is the direction they are loaded in.
Can I cut in more than one direction?
Yes. Add as many cuts as you need across X, Y and Z, each with its own slider and its own connector type.
Auto-suggest Combines axes for you when one direction alone will not bring the part inside your bed.
Made by meshcast.app. Got stuck? Email a photo and I'll help you debug.