How to make a press mold (3D-printed die + piston)
This guide was drafted with AI assistance.
Generate a die + piston press mold with the press mold generator, print both parts in PLA or PETG (no supports), pack your material, press firmly, then release. This walkthrough uses a bath bomb mix as the concrete example, mix baking soda and citric acid roughly 2:1, spritz with witch hazel until it just clumps, overpack, press, twist apart and cure overnight. The same die + piston technique works for clay and pressed soap, just swap the fill material and skip the fizz chemistry. One printed mold makes dozens of pieces.
What the generator does, and what it doesn't
Handled for you
- Makes the die and the matching piston as one fitted pair, with a piston clearance you can tune
- Detects whether your shape wants a round or a rectangular outer body, and lets you override it
- Adds padding around the model and an optional ejector hole for popping the pressing out
- Sizes everything from the model, so a bath bomb and a soap bar both come out proportioned
Still your call
- For flat, chunky, releasable shapes. Deep undercuts and tall thin silhouettes will not press out
- Pressed powder and clay pick up every layer line, so the cavity finish is the finished surface
- It presses a shape, it does not cast a liquid. For anything pourable you want a mold, not a press
If the generator refused your file, the message is explained here: why was my model rejected. Almost every rejection is the same thing, a mesh with holes, and the “Fix it for me” button in the popup resolves most of them in one click.
How a press mold works
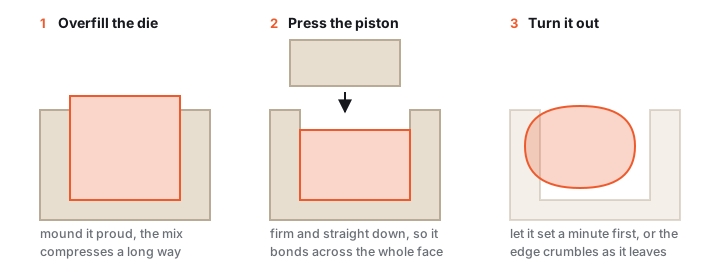
A press mold doesn't cast a liquid, it compresses a packable material (powder, dough, damp clay) into shape. What you print is a reusable die + piston: a cup-shaped die you pack material into, and a piston that presses down to compact it. Pack the die, press the piston in, let it hold its shape, then lift the piston and release the finished piece.
Versus a hand-pressed clamshell, a printed press mold gives you any shape and size, hearts, eggs, tiles, minis for testing, costs a few grams of filament, and never rusts. It's dimensionally consistent, so every piece comes out the same size, which matters if you sell by weight. This guide walks through the technique using a bath bomb mix, since it's the easiest to describe precisely; if you're pressing clay, pack it firmly and press slowly (clay doesn't need a binder liquid); if you're pressing soap, use ground/grated soap or soap noodles rather than a liquid pour. If you're casting a liquid that sets instead (poured soap, resin, wax) you want a poured mold, see how to make a cast or the cold-process soap guide.
Print & press in 5 steps
Generate the press mold
Open the press mold generator, upload or pick a sample shape, and set the size, wall thickness and clearance. Preview the die + piston and download the STL or 3MF. Aim a few millimetres over your target finished size, the material compresses as you press, and a bath bomb in particular tightens slightly as it dries.
| Setting | Suggested |
|---|---|
| Finished sphere diameter | 55–65 mm |
| Cavity oversize vs finished | +2–4 mm |
Print the two halves
Slice at 0.2 mm (0.12 mm for an extra-smooth surface), 3 walls, 15% infill, no supports, print closed-end-down. PLA is fine; PETG gives a tougher, slicker cavity for lots of batches. The cavity texture transfers straight to the bomb, so keep it clean; the mold print-settings guide has the full profile.
Mix the batch
Combine the dry ingredients first, baking soda and citric acid at roughly 2:1, plus colour, fragrance and fine add-ins. Then spritz witch hazel sparingly, mixing constantly, until a squeezed handful just holds together. It should clump, not feel wet.
Overpack and press
Mound the mix proud above the rim of both halves, overfilling is what gives a dense bomb with no hollow centre. Press it in lightly with your fingers, then bring the halves together and squeeze firmly so the two domes bond across the seam. Press harder than feels necessary.
Release and cure
Leave the mold closed for a minute so the mix sets, then twist the halves apart and turn the bomb out onto something soft, bubble wrap or a foam cradle, never a hard counter. Cure several hours to overnight before handling or wrapping; fresh bombs are fragile until fully dry.
Pressing melted 3D-print waste rather than clay or soap? The recycled plastic mold generator is this same die and piston with a deeper charge chamber and the shred weight worked out for you.
Fix a sticking or crumbly bomb
| Symptom | Cause | Fix |
|---|---|---|
| Sticks in the mold | Mix too wet | Fewer sprays; dust cavity with cornflour or wipe the thinnest film of skin-safe oil |
| Crumbles on release | Too dry or under-pressed | Add a spray or two, overpack proud, squeeze harder |
| Visible seam line | Domes didn't bond | Overfill more, press firmly, smooth the seam with a fingertip right after release |
| Rough / pitted surface | Coarse cavity or wet mix | Print at 0.12–0.2 mm, sand the cavity once, keep the mix drier |
| Fizzes in the mold | Moisture reacting early | Use witch hazel not water, work fast, store dry mix sealed |
If a detailed shape still fights you, the mold release agent guide covers what's skin-safe and how little to use.
Press mold troubleshooting
The pressing sticks in the cavity
Cause Almost always too much moisture. A wet mix behaves like glue against a plastic wall.
Fix Spritz less, so the mix only just clumps when you squeeze a handful. Press firmly, then leave it in the closed mold for a minute before releasing; that short rest is what lets it hold its own shape.
Also A light dusting of cornflour, or the thinnest wipe of skin-safe oil in the cavity, drops the friction enough to matter. If the generator gave you an ejector hole, push from behind rather than prising at the edge.
The pressing cracks or crumbles as it comes out
Cause The opposite problem: too dry, or not packed hard enough, so there is nothing holding it together.
Fix Add moisture one spritz at a time and re-test the squeeze. Overpack deliberately, more mix than looks necessary, and press in stages rather than one shove, so air has somewhere to go.
Shape matters Thin edges and sharp corners crack first. If one feature fails every time, round it in the model rather than fighting the mix.
The piston jams, or will not go in at all
Cause Fit clearance too tight for your printer. The pair is generated to a nominal clearance; a printer that runs wide eats all of it.
Fix Regenerate with a larger piston fit clearance, or sand the piston lightly. Check for a first-layer elephant's foot on the piston base, which is the usual real culprit and takes ten seconds with a file.
What size should a bath bomb mold be?
A standard bath bomb is a sphere 55 to 65 mm across.
Size up slightly Make the cavity a few millimetres larger than the finished size you want, +2 to +4 mm. The mix compresses as you press and then dries a little tighter than the wet pack, so a cavity sized exactly to target gives you a bomb that is slightly small.
PLA or PETG?
PLA is fine. The mix is dry, the contact is brief, and there is no heat or solvent involved, which is what usually rules PLA out elsewhere.
PETG if You are pressing dozens. A slightly slicker, tougher cavity releases better over many repeats and survives being scraped out.
How do I get a smooth surface?
The cavity finish is the finished surface, so it starts at the slicer.
Print Fine layers, 0.12 to 0.2 mm, and 3 walls so the infill pattern cannot telegraph through.
Pack Overpack so the mix presses tight against every face; a light pack leaves pits wherever it did not quite reach.
Once Sanding the printed cavity smooth is a one-off job that improves every pressing after it.
Can I just print the bath bomb itself?
No. A bath bomb is pressed powder, not a printable material, and the fizz comes from a dry acid and base meeting water.
You print a reusable press mold and pack your own mix into it. One printed mold makes dozens of bombs in any shape you can model, which is the actual win over a metal sphere.
Made by meshcast.app. Got stuck? Email a photo and I'll help you debug.