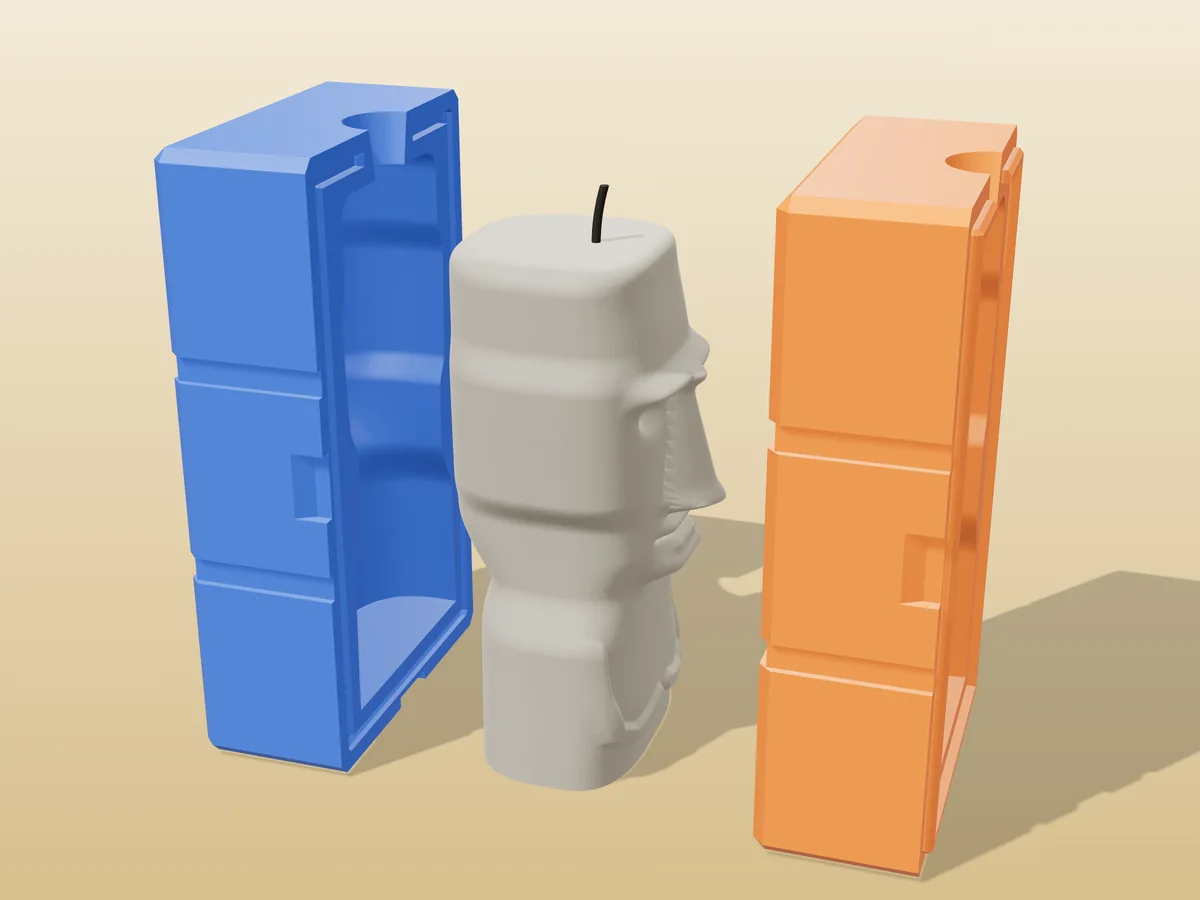
A Moai candle 110 mm tall and 54 mm wide: the long head of the Easter Island statues with a heavy brow, a long nose, pouting lips, a jutting chin and long ears, standing on a torso with the arms and long-fingered hands carved across the belly.
The mold is exactly what our two-part candle mold generator builds for it: two rigid halves with rubber-band grooves, pry pockets and a pour funnel on the flat top of the head. The seam runs ear to ear, and the face was modelled so every part of it can be seen from straight ahead, so the front half pulls off the face without catching anywhere. The tool's own seam check finds nothing stuck, and you need no silicone.
It is a candle people buy as a gift and a shelf piece, and it looks best in stone colours: grey, sand, terracotta or a charcoal with a little mica rubbed into the brow. The zip carries both halves, the Moai master as its own STL, the tool's own print-settings sheet and a recipe file that puts every setting back on the generator.
Shown as a 3D render of the printed mold halves pulled apart around the candle they cast, not a photo.
What you need
- About 176 g of pillar wax: the cavity holds 195 ml
- A tabbed, primed wick for a 50 mm candle, about 130 mm long
- Rubber bands or clamps, and a clip or wick bar across the funnel
How to cast it
- Print both halves as exported. Clamp-strength settings: 4 walls, 40% gyroid infill, no supports.
- Drop a tabbed wick into one half so the tab sits on the cavity floor, close the halves and band them along the whole seam.
- Clip the wick centred across the pour funnel and pour at 65 to 75 C.
- Once the first pour is firm but still warm, top up the funnel. A candle this size shrinks a lot and the second pour fills the dip.
- Cool fully, then open the halves at the pry pockets. The face comes out of the front half first; trim the wick.
| Cast material | Candle wax |
|---|---|
| Total print time | 25 h 12 min |
| Printed parts | 2 |
| Size (W x D x H) | 67 x 75 x 131 mm |
| Filament | ~306 g |
| Layer height | 0.2 mm |
| Infill | 40% |
| Supports | Not needed |
| Printer | Sliced with PrusaSlicer 2.7.2: 0.4 mm nozzle, 0.2 mm layers, 4 walls, 40% gyroid, MK3-class speeds, the low end of what the tool's own sheet asks for a mold that gets clamped shut. PLA+ or PETG, no supports. |
| Download | ZIP: 2 printed parts (STL) + candle master (STL) + print sheet + recipe |
| Added | 2026-09-24 |
Pro early access until October 24, 2026, then free with any account.
Free for personal use. Selling the pieces you cast needs a commercial licence (Pro or Founder); passing on the file itself is not permitted on any plan. Full terms.
Made with the free candle mold generator. Upload your own model and get the same kind of mold built around it, in your browser.
New to casting? Read the candle mold guide.