Make a 3D print timelapse without a printer
This guide was drafted with AI assistance.
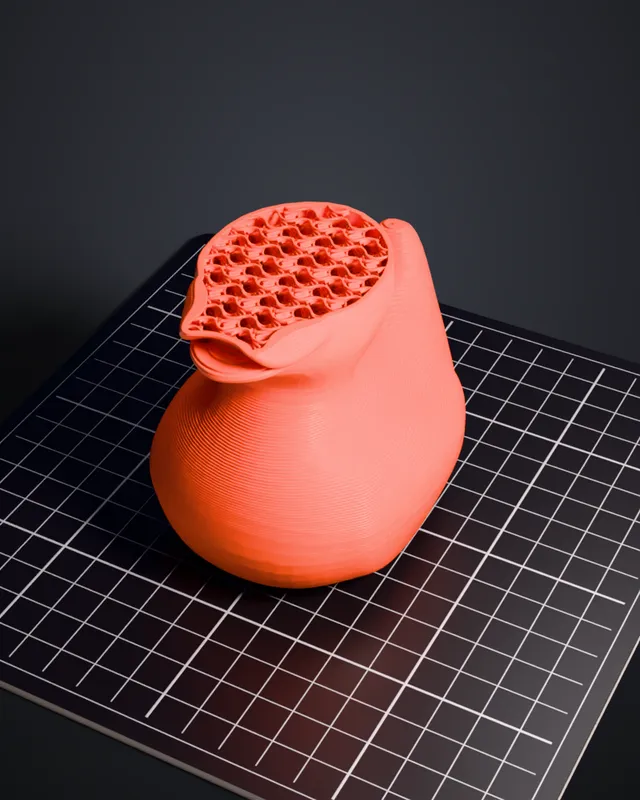
Upload an STL, OBJ or 3MF to the print timelapse maker and it renders the model printing itself, layer by stepped layer, on a virtual build plate with layer lines and studio lighting. Export a vertical 9:16 MP4 in seconds, or queue a photoreal studio render. No printer, no camera, no Blender.
What the tool does, and what it doesn't
Handled for you
- Slices your model into real layers at the height you pick (0.08 to 0.6 mm) and reveals it one layer at a time, stepped like a real Octolapse timelapse, never a smooth rise
- Puts it on a virtual build plate (smooth, textured PEI gold, or a dark textured sheet) with printed layer lines on the model's surface
- Lights the scene with studio presets, so you never touch a lamp or an HDRI
- Exports a quick in-browser MP4 in seconds, or a photoreal studio render on our server in minutes, from the same scene
Still your call
- The framing: drag the canvas to place the camera, and decide whether it holds still or orbits slowly
- Whether the clip reads as a quick print or an overnight one; the duration you pick against the model's layer count decides that (see making it look real)
- Whether and where you disclose that it is a render (see the honest section)
No model handy? Anything you make with the free Meshcast generators drops straight in, and a heavy scanned mesh can be shrunk first with the free STL optimizer so the browser preview stays smooth.
What a print timelapse is, and why the viral ones are often renders
The classic setup is Octolapse or a printer's built-in camera: the print head parks in the same corner at the end of every layer, a photo fires, and hours later a script stitches thousands of frames into a clip. It is a beautiful effect, and it is also fragile. The camera must not move for the whole print, the lighting must not change as the sun crosses the room, the print must not fail at hour six, and the one take you get is whatever the physical print gave you.
Which is why a surprising share of the slick timelapses in your feed were never filmed. They are renders: the finished model, revealed layer by layer in a 3D scene with a virtual camera and virtual lights. A render gets unlimited takes, perfect light, any camera angle, and zero filament. The look is so established that the render and the recording have converged on the same visual grammar, the stepped rise, the still camera, the textured plate. The print timelapse tool automates exactly that grammar.
Make one in 4 steps
Upload a model
Drop an STL, OBJ or 3MF into the print timelapse maker. It lands on the virtual build plate and is quantized into layers immediately, so the timeline scrubber already steps through the print.
Set the print look
Pick a filament color and finish, a layer height (0.08 to 0.6 mm; 0.2 mm is the believable default), and an infill density, which is what shows as a crosshatch on the sliced top while a layer is still printing. Then choose a lighting preset: dark studio, window light or warm desk. The layer lines on the model track the layer height you picked, so a chunky 0.4 mm draft print and a fine 0.12 mm one genuinely look different.
Frame the shot
Drag the canvas to place the camera, and either leave it fixed or switch on the slow orbit. Set the duration (3 to 20 seconds), the aspect ratio (16:9, vertical 9:16, or square 1:1), the resolution (540p, 720p or 1080p) and 24 or 30 fps. Leave the end hold on: real timelapse edits always rest on the finished print for the last second or two.
Export the video
Two paths out of the same scene. The quick export renders in your browser with WebCodecs and hands you an MP4 in seconds, ideal for iterating on framing. The studio render queues the scene on our server and path-traces it: physically based filament materials, soft studio light, and it comes back in a few minutes looking photoreal. Draft with the first, post the second.
Making it look real
| Rule | Why it sells the shot |
|---|---|
| Stepped reveal, never smooth | One photo per layer means the print jumps up a layer at a time. The tool does this by design; do not try to smooth it in an editor afterwards |
| 0.2 mm layer height | The default of most real printers, so the layer lines land at a spacing people have seen a thousand times. 0.08 mm on a small model makes the steps invisible and the clip stops reading as a print |
| Fixed camera, or the slowest orbit | Timelapse cameras are clamped to the printer frame or a tripod. A confident sweeping move is the fastest way to look like a product render instead |
| Textured plate, matte finish | PEI gold and dark textured sheets are what real beds look like on camera, and a matte filament hides the too-perfect specular highlights that betray CG |
| Hold the finished print | Every real timelapse edit rests on the completed part before the cut. The end hold is that beat; keep it |
| Let many layers pass per frame | A tall model at 0.2 mm is hundreds of layers. Compressed into a short clip, several layers advance every frame, exactly like an overnight print squeezed into ten seconds. A short duration on a tall model therefore looks like a long, serious print; stretching the duration makes it read as a small quick one |
| Vertical 9:16 for socials | Reels, TikTok and Shorts crop everything else. Render vertical at 1080p and 30 fps instead of letting a platform crop your 16:9 |
Worth a timelapse
All free designs →
When to say it's a render
If the video exists to show off a model, a design, or just to be satisfying to watch, a render is decoration and nobody is being misled about anything that matters. Plenty of well-known accounts post rendered timelapses for exactly this, and audiences care about the model, not the provenance of the footage.
It becomes evidence the moment someone could reasonably act on it: you sell prints and the clip implies this part came off your printer; you claim a model prints support-free and the timelapse is the proof; you give print-settings advice over the footage. In those cases, write "render" or "simulated timelapse" in the caption. It costs one word, and being caught passing a render off as a real print costs a great deal more than that.
The manual Blender way (the hard way this tool automates)
Before tools like this, the standard technique was an animated boolean in Blender, and it is still worth knowing, both to do it by hand and to appreciate what you are skipping.
The recipe, if you want to build it yourself
Import the model and add a cube larger than its footprint. Give the model a Boolean modifier set to Intersect with the cube, so only the part of the model inside the cube exists. Now animate the cube's top surface upward: keyframe its Z position at the model's base on frame 1 and above its top on the last frame.
The detail everyone misses first time: set the keyframe interpolation to Constant and add one key per layer (or drive Z with a floor() expression at your layer pitch), so the cut rises in discrete steps. Bezier-interpolated keys give you the smooth rise that instantly reads as fake.
For the surface, build a layer-line material: a wave texture mapped to the object's Z coordinate at the layer pitch, fed into a bump node, so horizontal ridges appear at exactly the spacing of your fake layers. Add a plate, a backdrop and a three-point light or an HDRI, then render the animation in Cycles.
It works, and it is a genuinely good Blender exercise. It is also an evening of setup, booleans that flicker on coplanar faces, interpolation you will forget to set to Constant at least once, and a Cycles render measured in hours for a ten-second clip. The timelapse tool is that exact pipeline, the stepped boolean, the layer-line material, the studio light rig, wired up and rendered for you, with the browser preview for free and the path-traced pass as the optional studio render.
Filming a real timelapse vs rendering one
| Filming it (Octolapse + camera) | Rendering it (/timelapse) | |
|---|---|---|
| Hardware | Printer, camera or webcam, mount, steady lighting for the whole print | A browser |
| Time to a usable clip | The full print time, hours to days, plus stitching | Seconds (quick export) to minutes (studio render) |
| Failure modes | Failed print, bumped camera, light shifting mid-print, one take only | Re-render as many times as you like |
| Camera and lighting control | Whatever fits around a running printer | Any angle, any preset, changed in one click |
| Material cost | Filament + electricity per take | None |
| What it proves | That this part really printed, with these settings | Nothing about printability; it is a visualization |
| Best for | Print evidence, settings tutorials, documenting a real build | Showcasing models, social content, previews of unprinted designs |
The last row is the honest summary: film when the footage is the proof, render when the footage is the pitch. Many makers do both, a render to announce a design and a filmed timelapse when the physical print lands.
Timelapse FAQ
Do I need a 3D printer, a camera or Blender?
No. Everything a real timelapse rig does, the printer, the camera, the lighting and the hours of filming, is simulated. Upload a model, pick how it should look, export a video.
Where it runs The preview and quick export run in your browser; the optional studio render runs on Meshcast's server and comes back in minutes.
Is it wrong to post a rendered print timelapse?
Posting a render is fine; passing one off as proof is not. For showcasing a model or design, nobody is harmed, and plenty of the viral timelapses you have seen are renders too.
Disclose when you sell prints, claim a part prints without supports, or give settings advice over the footage. There the clip is functioning as evidence, so say "render" in the caption. More in the honest section.
What files can I upload?
STL, OBJ or 3MF. Anything from the free Meshcast generators works directly, and so does anything you modelled or downloaded.
Heavy meshes A multi-million-triangle scan renders slowly in the browser. Run it through the free optimizer first; it shrinks the file without visible detail loss.
Why does the model rise in steps instead of growing smoothly?
By design. Real rigs take one photo per finished layer, so the print jumps a layer at a time. A smooth continuous rise is the single biggest giveaway that a clip is fake.
So the reveal is quantized to whole layers at your chosen layer height, and never interpolates between them. Do not smooth it afterwards in an editor either.
Quick export vs studio render: which should I use?
Quick export renders in your browser (WebCodecs) and gives you an MP4 in seconds, using the same preview you are looking at. Use it to iterate on framing and duration.
Studio render queues the same scene on our server and path-traces it: physically based materials, soft studio light, a few minutes' wait, noticeably more photoreal. Use it for the version you post.
Which settings look most realistic?
0.2 mm layers, a fixed camera or the slowest orbit, a textured plate, a matte finish, and the end hold left on. Vertical 9:16 at 1080p and 30 fps for Reels and TikTok.
Avoid 0.08 mm layers on a small model: the steps become invisible and the clip stops reading as a print. The full checklist is in making it look real.
Can I use the video commercially?
The video is yours: it is rendered from your uploaded model, so what you may do with it follows from the rights you hold in that model. Your own designs and models from the Meshcast generators: yes, including monetized accounts.
Downloaded models Check the model's licence; the render inherits whatever its terms allow.
Made by meshcast.app. Got stuck? Email a clip and I'll help you debug.