How to make a photo candle mold (a lithophane candle)
This guide was drafted with AI assistance.
Drop a high-contrast photo into the photo candle designer. It wraps the picture around a candle as a lithophane relief (dark = thicker wax, bright = thinner), right in your browser. One click, Use in a mold generator, sends it to the two-part box mold tool to build the printable mold. Cast pale, translucent wax below 85 °C, and when the candle is lit the flame backlights the wall and the photo appears. Rotate the image so the mold seam lands on the background, not a face.
What the generator does, and what it doesn't
Handled for you
- Turns your photo into a real 3D relief wrapped around a cylinder, not a printed image
- Sends the finished candle straight to the two-part mold tool, no download and re-upload
- That mold tool runs the same two-part mold engine as the candle mold maker, with a pour spout and vent
- Gives you a rotation slider and a live parting plane, so you place the seam yourself before it ever reaches the mold tool
Still your call
- The image becomes a relief, so contrast matters far more than resolution. A busy photo reads as mud
- It wraps a flat image onto a cylinder, so faces near the seam distort. Use the rotation slider to place the seam
If the generator refused your file, the message is explained here: why was my model rejected. Almost every rejection is the same thing, a mesh with holes, and the “Fix it for me” button in the popup resolves most of them in one click.
What a lithophane candle is
| Wax | Image shows? | Notes |
|---|---|---|
| Undyed paraffin | Best | Most translucent of the common waxes, and cheap enough to practise with |
| Soy blend, undyed | Good | Softer glow, natural, slightly more diffuse edges |
| Lightly tinted wax | Reduced | A pale tint is fine; each step darker costs contrast |
| Dyed or opaque wax | No | Colour blocks the light that makes the picture appear at all |
| Beeswax | Weak | Naturally opaque and yellow, so the effect barely registers |
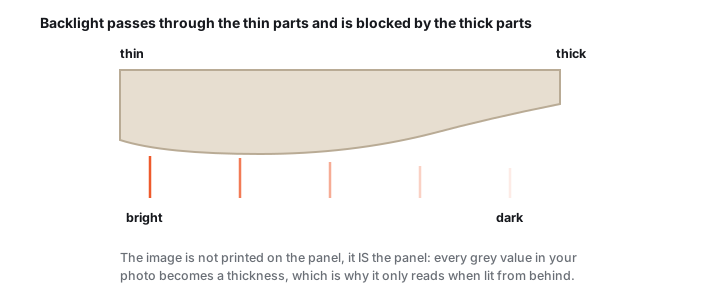
A lithophane reveals an image through thickness: light passes through a thin translucent panel, and where the material is thicker less light gets through, so a photo appears in shades of light and dark. A lithophane candle wraps that idea around the candle wall. The flame inside becomes the light source, so once it's lit the picture glows through the wax.
The photo candle designer turns your photo into a watertight candle master (the positive, with the image embossed on the wall). From there, one click hands it to the candle mold maker, which reuses the same two-part box-mold engine to carve a printable mold around it. Pour wax into the mold and every candle comes out with the picture in relief.
From photo to glowing candle in 5 steps
Upload and tune the photo
Drop in a high-contrast photo, a portrait, a pet or a bold silhouette. Use Contrast and Brightness to make the subject pop, and Invert if it's light on a dark background. Under Advanced, Max relief sets how thick the darkest areas get: more relief means more contrast when lit, but keep the bright areas at least ~0.8 mm so they still print.
Size the candle
Set the Diameter and Height. Height auto-fits your photo's aspect ratio when you upload, so the picture wraps all the way around without stretching, adjust either freely afterwards. A 70 mm pillar is a good first pour.
Rotate to place the seam
A two-part mold leaves a parting line, and the orange plane shows exactly where it falls, on the sides of the candle, with your subject centred on the front. Drag Rotate image so the seam sits on background or an unimportant area, never across a face. The faint line scrapes off after casting, but you don't want it splitting the picture.
Send it to the mold tool, generate, and print
Click Use in a mold generator. It hands the candle straight to the two-part box mold tool, no download and re-upload. Hit Generate there, and it carves the two halves with a pour hole and downloads them as a 3MF. Print both flat-face-down on the same plate at 0.12–0.2 mm, 3 walls, no supports, in PLA. Dry-fit before pouring: the seam must close with no daylight through it. Want to sanity-check the picture first? Back on the candle designer, download the candle master, print it in translucent PLA and hold it to a light.
Cast wax and light it
Thread the wick through the pour hole and centre it on a pencil. Clamp the halves with rubber bands and pour pale, translucent wax below ~85 °C so the PLA doesn't soften. Cool several hours at room temperature, open the seam and lift the candle out. Then light it: the flame backlights the wall, thin areas glow and thick areas stay dark, and the photo appears.
New to pouring? The candle-making walkthrough covers wax types, wick sizing and pour temperatures in depth. Prefer a flat panel instead of a candle? Try the photo lithophane generator.
Photo candle troubleshooting
The lit candle shows nothing, or just a blur
Cause Almost always the photo, not the print. A lithophane has only brightness to work with, so a low-contrast image has nothing to turn into thickness.
Fix Desaturate the photo on your phone first. If it does not read in grayscale it will not read in wax. Crop tight on one subject, and pick a shot with a plain background and clear light-to-dark separation.
Second cause Dense dye in the wax. Colour blocks the light that makes the image appear, so a strongly coloured candle hides the effect no matter how good the photo was.
The seam runs straight through the face
Cause A two-part mold always leaves a parting line, and by default it lands where the split plane happens to fall.
Fix Use the Rotate image slider to spin the picture around the cylinder until the seam sits on the back. The orange plane in the preview is the seam, so you can place it before you generate anything rather than discovering it after a pour.
The image is there but faint and washed out
Cause Not enough thickness range between light and dark, usually because the wall is too thin overall or the wax is too opaque.
Fix Use a pale translucent wax, paraffin or a light soy blend, undyed or barely tinted. Then let the candle burn in properly: a fresh candle lights only the top, and the effect appears when the flame sits down inside the wall.
What photos work best?
High contrast, one clear subject, plain background. Portraits, pets and bold silhouettes.
Why The wall is only a few millimetres thick, so it has less thickness range to work with than a flat lithophane panel. Fine detail is softer here, which means a busy scene turns to mud where a simple one reads perfectly.
Does the picture show when the candle is not lit?
Only faintly, as a subtle relief you can see at an angle and feel with a fingertip.
The effect is physical, not printed: the flame backlights the wax wall, thin areas glow and thick areas stay dark, so the photo appears in light. Unlit, there is nothing to backlight it. That is the same reason a lithophane panel looks like a grey card in daylight.
Why cast it at all, instead of printing the candle shape?
You can print the master in translucent PLA and backlight it to preview the effect, and it is a good sanity check before you buy wax.
But a print gives you one object per print, in plastic, that you cannot burn. The mold is reusable, so you cast the same design in real wax as many times as you like, and lit wax glows far better than lit plastic.
Made by meshcast.app. Got stuck? Email a photo and I'll help you debug.
If the generator refused your file, the message is explained here: why was my model rejected. Almost every rejection is the same thing, a mesh with holes, and the “Fix it for me” button in the popup resolves most of them in one click.