Gingerbread house 3D print: a kit with icing, or a house that glows
This guide was drafted with AI assistance.
Open the gingerbread house maker. It starts on the gingerbread house kit: ten flat panels (six plus four for the chimney) that print lying down with the icing on top. One filament change at 2.4 mm (layer 13 at 0.2 mm layers) turns the icing white on any printer; then you glue the panels together. Or switch to Tealight house for one hollow piece that prints standing with no supports and glows over an LED tealight.
Design a gingerbread house kit or a tealight house, put your name on it, download the STL. Free, in your browser.
Open the gingerbread house maker →Kit or tealight house
The tool makes the same house two ways. The windows, the door and the gable window land in the same place for the same settings, so you can design once and switch.
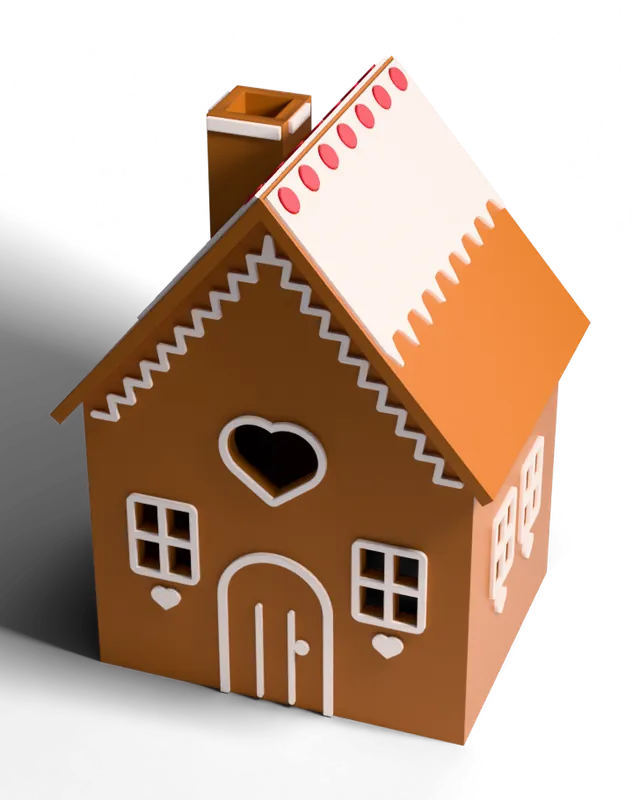
| Gingerbread kit | Tealight house | |
|---|---|---|
| Pieces | 10 flat panels (6 without the chimney) | 1 hollow piece, open at the bottom |
| Prints | Lying down, icing up | Standing up |
| Colors on one nozzle | Two: one filament change | One; white or natural PLA glows best |
| Decoration | Piped icing: frames, trim, snow, scallops or tiles, hearts or stars, sweets | Engraved bricks, planks or half-timbering, roof tiles or shingles, snow |
| Assembly | Glue | None |
What you need
- Filament: a brown or ginger PLA and a white one for the kit. White or natural PLA for a tealight house, so the light comes through the thin parts.
- Glue for the kit: superglue gel or a hot-glue gun.
- Light (optional): an LED tealight (the common ones are 38 mm across) or a battery light string. Tick "Cable slot in the back wall" for the string's wire.
- A printer with a 0.4 mm nozzle and a pause or filament change command (M600, or your slicer's color change).
Step by step: the gingerbread kit
Pick a shape and size
Cottage (70 × 56 mm, 56 mm walls), Tall (58 × 52 mm, 96 mm walls) or Wide (86 × 62 mm, 40 mm walls). Then fine-tune: width and depth 40 to 140 mm, wall height 30 to 140 mm, roof steepness 40 to 62 degrees.
Windows, door and icing
Windows with panes, arched, round, star or heart, cut out so light shines through or piped on. An arched or square door, piped on or cut out too. On the roof: snow, scallops, tiles or plain. A zigzag or dotted icing trim along the edges, hearts or stars under the windows, and sweets on the ridge and by the door.
Add a name
One or two lines ("Familie Müller", a year), placed wherever there is most room, in the gable or above the door. In the kit the letters are piped icing, so they come out white with the rest.
Check the readout
Under the preview the tool lists the number of flat pieces, how much bed they take, whether that fits, the built size, and the height for the filament change. "Show print layout" shows the panels the way they sit in the file.
Download
STL is all the panels packed on one plate in one file. 3MF keeps the gingerbread, the icing and the sweets as three parts with their colors set, for an AMS, MMU or tool changer. STL per piece (ZIP) gives every panel its own file, for a bed the packed kit does not fit.
Print, then glue
Flat on the bed, icing up, no supports. Change filament at the height shown, then glue the pieces together (below).
White icing from one nozzle
Every kit piece is a flat panel of the same thickness with everything decorative on top of it: window frames, door, trim, the name, the roof snow. So the whole kit splits at one height:
- Slice the STL in brown.
- Add a color change at the height the tool names. That is the panel thickness: 2.4 mm by default, layer 13 at 0.2 mm layers. The panel thickness can be set from 1.6 to 4 mm under Advanced settings, and the change height moves with it.
- When the printer pauses, load white and resume.
Print settings
| Setting | Kit | Tealight house |
|---|---|---|
| Layer height | 0.2 mm (the default 2.4 mm panel is twelve whole layers) | 0.2 mm |
| Orientation | As downloaded, flat | As downloaded, standing |
| Supports | None | None |
| Material | PLA, brown and white | White or natural PLA to glow |
More on picking filament in PLA vs PETG vs PP vs TPU, and on color changes in multicolor printing without an AMS.
Gluing the gingerbread house together
- Walls: the front and the back are the full width; the two side walls go between them. Glue the sides to the inside edges of the front and back and let it set square.
- Roof: lay the two roof halves on the sloped edges of the gables so they overhang evenly. Their ridge edges are cut at an angle so the two halves meet face to face along the top.
- Chimney: four small panels. Glue the two short sides between the front and the back, with the slanted edges down, then set it on the bare patch of the left roof half.
Superglue gel holds the butt joints quickly; hot glue gives you a few seconds to adjust and fills small gaps. The kit has no floor, so an LED tealight or a light string goes in from underneath, and cut-out windows let its light through.
The light up Christmas house
Switch to Tealight house for one hollow piece with an open bottom. Set it over an LED tealight and the light comes out of the windows, the door, the open chimney and any stars cut through the roof. Engrave bricks, planks or half-timbering into the walls and tiles or shingles into the roof; an engraved name leaves a thin skin of wall (0.6 mm by default), so it glows in white PLA and no letter middle falls out. A raised name, the roof and optional snow go in the 3MF as their own parts for a multicolor printer.
It prints standing, no supports: the roof slider stops at 40 degrees, steep enough for the ceiling inside. The readout tells you whether an LED tealight fits under it and warns when the inside is too small. Several in different shapes make a Christmas village for a windowsill or a mantelpiece.
Gift and Christmas market ideas
- A family name over the door: "Familie Müller" or "The Smiths, 2026" in the gable makes a personal gift for the windowsill.
- An unbuilt kit as a present: the flat panels stack in a small box with a tube of glue, and building it is part of the gift.
- A Christmas village: a cottage, a tall and a wide house in the same colors, each over its own LED tealight.
- A table centrepiece with a battery light string through the cable slot.
Selling them: personalised houses suit a Christmas market stall or an online shop, because the name makes each one a one-off. Free downloads are for personal use and gifts and carry a small Meshcast mark. To sell what you print you need Pro, which adds commercial rights and swaps the mark for your own logo. For pricing, see how much to charge for what you make.
Problems
The icing started a layer too late, or the panel tops are white
Cause The change went on the first layer that shows icing in the slicer preview, or a layer early.
Fix Put it at the height the tool names (2.4 mm, layer 13 by default). If you changed Panel thickness or layer height, use the new value the readout shows.
The pieces do not fit on my bed
Cause Without a printer chosen, the kit is packed for a 256 mm bed.
Fix Pick your printer in the viewer; the pieces are packed again for it. Still too big: download STL per piece (ZIP) and print on two plates. If one piece alone is too big, make the house smaller.
The roof halves leave a gap at the ridge
Cause The side walls are glued outside the front and back, or not square, so the gables sit at the wrong spacing.
Fix The sides go between the front and back. Let the walls set square before the roof goes on; hot glue fills a small gap.
The tealight does not fit under the house
Cause The house is too narrow or shallow inside for a 38 mm tealight.
Fix The readout warns about this. Make the house wider or deeper until it says a tealight fits.
The engraved name does not glow
Cause Dark or very opaque filament.
Fix Print the tealight house in white or natural PLA. The thinner the skin behind the letters (Advanced settings), the brighter they glow.
FAQ
How many pieces is a 3D printed gingerbread house kit?
Ten flat pieces with the chimney: the front and the back, two side walls, two roof halves and four small chimney panels. Without the chimney it is six. Every piece prints lying down with the icing on top.
How do I print white icing on a single-nozzle printer?
Add one filament change at the height the tool shows. It is the panel thickness, 2.4 mm by default, which is layer 13 at 0.2 mm layers. Load white when the printer pauses. The sweets sit in the same band, so on one nozzle they come out white too; the 3MF gives them their own color on a multicolor printer.
What if the kit does not fit my print bed?
Pick your printer in the viewer and the pieces are packed again for its bed. If they still do not fit in one go, download STL per piece (ZIP) and print them on two plates. If even the biggest single piece is too big, the tool says so: make the house smaller.
Can I put a real candle inside a 3D printed house?
No, LED tealights only. PLA starts to go soft at about 60 °C, so a real flame inside a printed house is a fire risk. The common LED tealight is 38 mm across, and the tool warns you when the inside of the tealight house is too small for one.
Does the tealight house need supports?
No. It prints standing up in one piece with the bottom open. The roof steepness slider stops at 40 degrees at its shallow end, which keeps the ceiling inside and the underside of the eaves steep enough to print without supports.
Can I sell gingerbread houses I print?
Free downloads are for personal use and gifts, and carry a small Meshcast mark. To sell what you print you need Pro, which adds commercial rights and swaps the Meshcast mark for your own logo.
Made by meshcast.app. Built one? Send a photo, we'd love to see it.