Personalized Christmas bauble: a round ornament with a name, 3D printed
This guide was drafted with AI assistance.
Open the bauble designer, pick a ball, drop, onion or cone, a pattern and a name, and download. You get two halves that each lie flat on their cut face and print without supports. Push 5.5 mm pieces of 1.75 mm filament into the pin holes (three for filled halves, four for hollow ones), glue the rims with superglue gel and fit a metal ornament cap into the 14 mm neck, or tie a ribbon through a printed loop.
Pick a shape and a pattern, type a name, download two halves. Free, in your browser.
Open the bauble designer →What you get
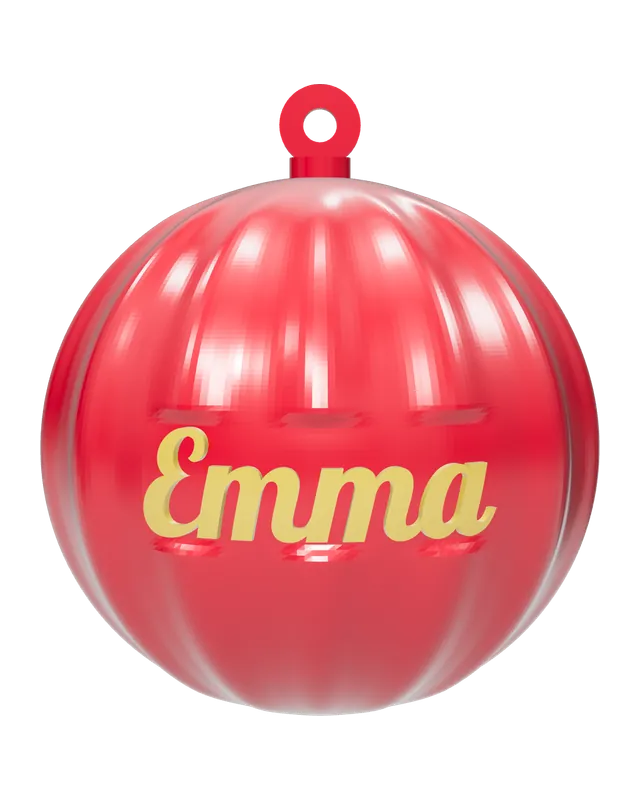
A real round bauble, not a flat ornament: a ball, a teardrop-shaped drop, an onion dome or a long cone, smooth or with ribs, spiral ribs, facets or a honeycomb. A name, and a second line such as the year, wraps round the front. On a patterned bauble the name sits on a smooth oval plate that stands just proud of the pattern, the way shop-bought personalised baubles do, so no letter sinks into a groove.
Want a flat name ornament instead, which is quicker to print and needs no gluing? That is the personalized Christmas ornament guide.
What you need
- Filament: PLA. Silk and glitter PLA look most like glass ornaments.
- Pins: a few centimetres of any 1.75 mm filament, and side cutters or a craft knife.
- Glue: superglue gel.
- Top: a pack of metal bauble caps with spring wires, or ribbon or ornament hooks for the printed loop.
Step by step
Shape and pattern
Ball, drop, onion or cone. Then smooth, ribs, spiral, facets or honeycomb, with a count of 6 to 24 around the bauble (14 by default) and a depth of 0.6 to 3 mm.
Name and motif
One or two lines in one of six fonts, Retro Script by default, raised or engraved. Add a motif above the name if you like: a moose, a reindeer, a tree, a star, a snowflake, a snowman, a gingerbread man or a paw. Or leave the name empty for a plain bauble.
Size, top and fill
50 to 100 mm across, 80 mm by default. A neck for a cap or a hanging loop. Filled halves (the default, easiest to print) or Hollow ones (lighter, wall 1.2 to 3 mm). The readout gives the finished size with the neck or loop, roughly how many grams of PLA it takes, and how many pins to cut.
Download
Switch the view to Print parts to see what you get: a front and a back half side by side, each on its cut face. STL for one color, 3MF with the name as its own colored part for a multicolor printer.
Print, pin, glue, cap
Print both halves as they come, then put them together (below).
Getting the name and motif right
- Letter size runs from 6 to 30 mm (14 by default), but the name is shrunk if it does not fit the front. The readout says how tall the letters came out and whether they were made smaller.
- Long name: make the bauble bigger, split it over two lines, or make the motif smaller (12 to 50 mm).
- A second color on one nozzle does not work the way it does on a flat ornament: the name follows the curve of the dome, so it spans many layers. Use the 3MF on a multicolor printer, or pick Engraved and fill the letters with paint.
Print settings
| Setting | Use | Why |
|---|---|---|
| Orientation | As downloaded | Each half lies on its flat cut face, dome up |
| Layer height | 0.12 to 0.16 mm | The curve near the top of each dome looks smoother |
| Walls | 3 to 4 perimeters | The shell is all wall |
| Infill | 15% for filled halves | What the grams estimate assumes |
| Supports | None | Filled halves have no overhang; hollow ones only at the very top of the dome inside |
| Material | PLA, silk PLA | Silk and glitter PLA look like glass ornaments |
Pins, glue and an ornament cap
- Cut the pins: 5.5 mm pieces of 1.75 mm filament, three for filled halves, four for hollow ones. Cut them square.
- Dry fit: push the pins into the holes of one half and close the other half over them. The holes are 2 mm across, a push fit, and they line the halves up exactly. Check the rims meet all the way round before any glue goes on.
- Glue: a thin line of superglue gel on the rim, press the halves together, hold until it sets.
- Cap or ribbon: squeeze the spring wire of a metal ornament cap and push it into the neck, or tie a ribbon through the loop.
The neck is 14 mm across by default. If your caps are a different size, set Neck diameter under Advanced settings, from 10 to 20 mm.
Turn it into a bauble mold
Make a mold from it hands the solid bauble, not the halves, to a mold tool:
- Plaster mold: slip-cast a hollow ceramic bauble. The neck is the pour opening. Background in slip casting molds.
- Candle mold: a two-part mold for a ball candle, in wax or soap.
- Silicone mold: for resin or concrete baubles.
A hanging loop is left off the master, because it would lock the mold. The handoff itself costs no download; the mold tool counts its own.
Gift and Christmas market ideas
- One bauble per name for the family, same shape and colors, different names.
- Baby's first Christmas: the name on the first line, the year on the second.
- Pets: the paw motif with the pet's name.
- A matching set: ball, drop, onion and cone in one color with the same pattern.
Selling them: personalised baubles are a classic Christmas market and online shop item. Free downloads are for personal use and gifts and carry a small Meshcast mark. To sell what you print you need Pro, which adds commercial rights and swaps the mark for your own logo. For pricing, see how much to charge for what you make.
Problems
The pins will not go into the holes
Cause Printed holes come out a little under size, and the pin hole is only 0.25 mm bigger than the filament.
Fix Twist the pin in, cut its end square, or open the hole with a 2 mm drill bit by hand.
The halves do not close all the way
Cause A pin is too long for its holes, or a blob of filament sits on a rim.
Fix Dry fit first. If there is a gap, trim the pins a little at a time until the rims meet, and scrape any blob off the cut faces.
The seam shows round the middle
Cause Glue squeezed out of the joint, or the halves sat slightly offset while it set.
Fix Use a thin line of gel set back from the outer edge and keep the pins in place while it sets. A fine line can be filled and painted over, or hidden with a ribbon tied round the middle.
The top inside a hollow half printed rough
Cause The inside of a hollow dome is an overhang near the top.
Fix It is hidden once the bauble is closed. If it fails outright, switch to Filled halves.
The cap falls out of the neck
Cause Your caps are a different size from the default 14 mm neck.
Fix Measure the cap's collar and set Neck diameter to match under Advanced settings, or put a drop of glue on the spring wire.
FAQ
Does a 3D printed bauble need supports?
No. It is split into a front and a back half, and each half lies on its flat cut face with the dome up. Filled halves have nothing overhanging. Hollow halves are lighter, but the inside of each dome is an overhang near the top, so pick Filled if your printer struggles with that.
How do the two halves line up?
With pins cut from 1.75 mm filament. The halves have matching pin holes 2 mm across: three on filled halves, four on hollow ones. Cut 5.5 mm pieces, push them into one half, then glue the rims together with superglue gel.
What ornament cap fits the neck?
The neck is 14 mm across by default, for a standard metal ornament cap with a spring wire. If your caps are a different size, change Neck diameter under Advanced settings, from 10 to 20 mm. Or pick Hanging loop and tie a ribbon through it.
Can I print the name in a second color?
On a multicolor printer, yes: the 3MF carries the name as its own part with its own color. On a single nozzle a filament change does not work here, because the name follows the curve of the dome and spans many layers. Print it in one color, or pick Engraved letters and fill them with paint.
Can I make a bauble mold from the design?
Yes. Make a mold from it sends the solid bauble to a mold tool: a plaster mold to slip-cast a hollow ceramic bauble, a two-part mold for a ball candle, or a silicone mold for resin or concrete. The neck becomes the pour opening; a hanging loop is left off because it would lock the mold.
Can I sell baubles I make with it?
Free downloads are for personal use and gifts, and carry a small Meshcast mark. To sell what you print you need Pro, which adds commercial rights and swaps the Meshcast mark for your own logo.
Made by meshcast.app. Hung one on your tree? Send a photo, we'd love to see it.