Mesh former: print flat, heat-form any shape
This guide was drafted with AI assistance.
Upload a logo or silhouette to the free Meshcast mesh former and it builds three parts: a flat mesh panel in a stiff rim, and a matching plug and cavity to press it between. Print all three, drop the mesh into the cavity's pocket (it locates itself, no centring by eye), warm it with a heat gun (a household hair dryer works too) until it goes limp, then push the plug straight down into the cavity and hold until it cools. The flat sheet becomes a curved basket, bowl or shell, no supports, no CAD.
What this makes, and what it doesn't
Handled for you
- Traces your artwork into a rim plus a mesh, sized to always fit the same outline
- Builds a matched plug and cavity from that exact outline, so all three parts are never a few millimetres off each other
- Cuts a pocket into the cavity that the mesh's rim drops into, so it locates itself instead of needing to be centred by eye
- Prints the mesh flat with no supports and no overhangs, because at this stage it is still a sheet
Still your call
- The heating and pressing is a real physical step, by hand, with a heat gun or hair dryer
- A deep press thins the mesh more than a shallow one; the sidebar warns you before you print
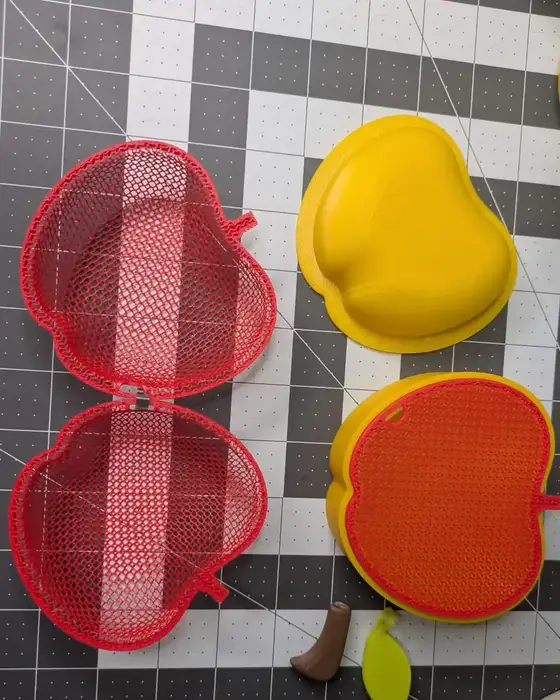
Press-forming it, step by step
Everything up to the download runs live in the browser. What follows is the physical half, which is the part a 3D preview cannot show you.
Print the mesh, then the plug and cavity
Print the mesh in a material that tolerates heat: PETG or ABS. PLA works but softens across a much narrower window and goes brittle if you overshoot. The plug and cavity spend almost no time hot, so PLA is fine for those two; print them flat side down at 40% infill or more, you are going to lean on them.
Stand the cavity opening up
On a board, opening facing up. It needs no vent holes, whatever the vacuum-forming guides say, because a mesh is already full of holes.
Drop the mesh into the cavity, bed side down
The cavity has a shallow pocket cut to the rim's own outline, so the mesh locates itself, nothing to centre by eye. Load it with the side that was against the print bed facing down: that face ends up as the smooth OUTSIDE of the finished shape.
Warm it slowly and evenly
Keep the heat gun (or hair dryer) moving, 15–20 cm away, aimed at the middle of the mesh, not the rim. You are aiming for limp, not glossy: once it shines you have gone too far and the struts will thin out and snap.
Push the plug in and hold until cool
Turn the plug over and push it straight down into the cavity until its flange sits flat on the block. The same flange clamps the rim in its pocket, so the outline cannot lift while the middle stretches. Hold until it is cool to the touch, under a minute. Let go early and it springs partway back.
Lift the plug out
The mesh comes out with it. The plug's wall angle is what makes this possible: straight sides would be gripped by the mesh as it shrinks.
Settings that decide whether it works
The generator's sidebar carries seven of these; the two that matter most are mesh thickness and depth, because between them they decide whether the struts survive being stretched.
| Setting | What it changes |
|---|---|
| Mesh thickness | The forming window. Around 1 mm softens quickly and evenly; much thicker and the rim reaches forming temperature before the mesh does. |
| Cell size | How closely the mesh follows detail. Fine cells drape over a curve; coarse cells bridge across it and leave flats. |
| Strut width | How much stretch each strand survives. Two to three nozzle widths, so every strut prints as solid extrusion rather than a thin under-filled line. |
| Frame width | How much the outline resists the heat. It also moves the press: a wider rim gives a smaller shape and stretches the mesh further. |
| Form depth | How far the mesh has to stretch. Every bit of area it gains going into the press comes out of its own thickness, so a printed 1 mm mesh can arrive at 0.9 mm or 0.4 mm depending on depth and shape. The sidebar warns you once it drops under 0.6 mm. |
| Shape | How hard the stretch is at the same depth. A cone hugs the flat and barely stretches; a plateau drags the mesh over a rim and a full flat top, asking the most of it. |
| Wall angle | How easily the cooled mesh lifts out of the press. Three degrees is the floor; more is safer on a deep form. A cone has no slider for it, its angle comes out of the depth and the outline, and the sidebar reports what it built. |
Common problems
The mesh tore while I pressed it
Either it was too cold in places, or the struts are too thin for the amount of stretch. Warm it for longer at a greater distance so the heat reaches the middle of the sheet, and raise the strut width or the mesh thickness a little.
The rim warped along with the mesh
Too much heat aimed at the edge. Work the gun over the middle and let conduction do the rest, and raise the frame width or height so there is more material holding the outline.
It sprang back flat after I let go
Released too early. The part has to cool fully under pressure. A quick pass with compressed air or a damp cloth over the pressed mesh sets it in seconds.
The mesh will not come off the form
The wall angle is too shallow for how deep the press is. A cooled mesh shrinks onto whatever it was pressed against, and only the taper lets the plug slide back out. Raise the wall angle, or lower the depth. On a cone there is no wall-angle slider, so lower the depth or switch to a dome.
The struts snapped near the top of the form
Too deep a draw for that outline. The mesh has to cover more area than it started with, and all of that comes out of its thickness. The sidebar warns you when it drops under about 0.6 mm, which is where the struts snap instead of stretching. Lower the depth, raise the mesh thickness, or pick a shape that closes in less sharply.
Can I use a hair dryer instead of a heat gun?
Yes, a household hair dryer works, it just takes longer to reach the same softness because it runs cooler. Keep it moving and closer to the mesh (10 to 15 cm), and be patient, rushing it with the rim instead of the middle is the more common mistake either way.
Made by meshcast.app. Got stuck? Email a photo and I'll help you debug.