How to make a mold in Blender, step by step
This guide was drafted with AI assistance.
To make a mold in Blender: import the STL, check it is manifold, put a cube around it, subtract the model with a Boolean modifier (Difference, Exact solver), cut the block into two halves, add alignment keys and a pour spout, then export each half as its own STL. It is free and it works, and it takes 20 to 40 minutes once you know Blender. If you only want the mold, a mold generator does the same steps from sliders in about a minute.
Before you start
This walkthrough uses Blender 4.x. Everything is in the free download, the only extra is the 3D Print Toolbox, which is an official extension (Edit > Preferences > Get Extensions, search "3D Print"). It checks your mesh and reports wall thickness, which saves a failed print later.
- Scale. An STL has no units. Blender reads 1 unit as 1 metre by default, so a 60 mm candle arrives as a 60-metre giant, or as 0.06 units if it was exported in metres. In Scene Properties > Units set Unit Scale to 0.001 and Length to Millimeters, and read the dimensions in the N panel.
- Closed mesh. In Edit Mode, Select > Select All by Trait > Non Manifold. If anything lights up, there are holes or loose edges. Fix them before you do anything else.
- Normals. Select all, Mesh > Normals > Recalculate Outside. Turn on Face Orientation in the overlays: the outside should be blue, never red.
Making the mold, step by step
Import and clean the model
File > Import > STL. Apply rotation and scale (Ctrl+A > All Transforms) so the booleans see the real size. Run the 3D Print Toolbox Check All; non-manifold edges, intersecting faces and zero-area faces all need to be zero. Scans and sculpts with hundreds of thousands of faces are slow here, so add a Decimate modifier and bring it down to 100k to 200k faces first.
Build the mold block
Add a cube (Shift+A > Mesh > Cube) and scale it so it is larger than the model on every side by your wall thickness. For a rigid printed mold that you pour wax or resin straight into, 3 to 5 mm of wall is typical; for a printed box that holds liquid silicone, leave 8 to 12 mm between the model and the box walls so the silicone itself is thick enough. Leave a bit more at the top for the pour spout.
Subtract the model
Select the cube, add a Boolean modifier, set it to Difference, pick the model as the object and use the Exact solver. Hide the model to check that the cavity is there, then apply the modifier. If the result is empty or has holes, go back to the three checks above: it is nearly always a non-manifold model.
Split it into two halves
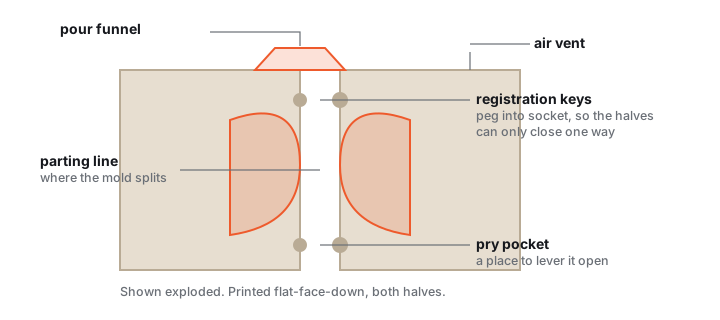
Decide where the parting line goes: usually along the widest outline of the model, so no part of the cavity leans back over the seam. Duplicate the block (Shift+D). Add a large cube that covers exactly one side of the parting line. On the first copy use a Boolean Intersect with that cube, on the second copy a Boolean Difference. You now have two halves that meet on a flat face.
Add alignment keys
Put three or four small spheres or cylinders on the parting face, away from the cavity. On one half, join them with a Boolean Union; on the other half, subtract slightly larger copies with Difference. Make the holes 0.2 to 0.3 mm larger than the pins so printed halves still close. Put them in an uneven pattern and the mold can only close one way.
Add the pour spout and vents
Subtract a cone from the top of the mold into the highest point of the cavity for the pour spout, and thin cylinders (2 to 3 mm) from any other high points so air can escape. For a candle, also subtract a thin cylinder through the bottom for the wick. For a silicone box, you pour from the open top, so skip the spout.
Export each half
Select one half, File > Export > STL with Selection Only ticked, and repeat for the other. Open both in your slicer before printing: if a half shows up as several separate pieces or with missing walls, the boolean did not close properly.
When the boolean goes wrong
| What you see | Why | Fix |
|---|---|---|
| The cavity is missing, or the block disappears | The model is not a closed solid | Select Non Manifold in Edit Mode, fill the holes, or run the 3D Print Toolbox Make Manifold |
| Random holes or spikes in the result | Overlapping or self-intersecting parts inside the model | Switch the Boolean to Exact, and join intersecting pieces into one solid first |
| The mold is 1000 times too big or small | Units: STL has none, Blender assumes metres | Set Unit Scale 0.001 and Length to millimetres, check dimensions before exporting |
| The inside is "inverted", the slicer shows no cavity | Normals pointing inward | Mesh > Normals > Recalculate Outside on the model before the boolean |
| Blender freezes on the boolean | Hundreds of thousands of faces | Decimate the model first; the cast will not show the difference at 100k faces |
| The halves will not separate after casting | An undercut crosses the parting line | Move the parting line, split into more parts, or fill the undercut on the model |
The faster way, if you only need the mold
Everything above is exactly what a mold generator automates. In Meshcast's rigid box mold you upload the STL, drag the parting line, and the keys, spout, vents and wall thickness are set from sliders. It checks the mesh, offers to fix a leaky file instead of failing, highlights undercuts and fills them in one click, and gives you both halves plus a sheet with print settings. For a silicone mold it also tells you how many millilitres and grams of silicone to mix.
Pick the tool for what you are casting:
| You are casting | Use |
|---|---|
| Candles and wax | Rigid box mold: two printed halves, keys, pour spout and wick hole |
| Resin, soap, detailed figures | Silicone mold maker: a printed box to pour silicone into, or a contoured shell that uses less silicone |
| Ice, wax melts, gummies | Tray mold, runs entirely in your browser |
| Concrete planters and vases | Vase and planter mold with a tapered core so the cast comes out hollow |
| Plaster and slip casting | Plaster mold, multi-part housings with clay-shrinkage presets |
| Bath bombs, pressed soap, clay | Press mold, a die and a piston |
Questions
Can you make a mold in Blender for free?
Yes. Blender is free, and a two-part mold only needs its built-in Boolean modifier plus the free 3D Print Toolbox extension to check the mesh. Expect 20 to 40 minutes per mold once you know the software.
Why does my Blender boolean not work?
Almost always because the model is not a closed (manifold) mesh, its normals point inward, or it has overlapping parts. Select Non Manifold in Edit Mode, recalculate normals outside, and use the Exact solver.
What wall thickness should a 3D printed mold have?
For a rigid mold you pour wax or resin into, 3 to 5 mm of wall is typical. For a printed box that holds liquid silicone, leave 8 to 12 mm between the model and the box so the silicone is thick enough to hold its shape.
How do I get the right size in Blender?
STL files have no units. Set Scene Properties > Units to a Unit Scale of 0.001 and Length in millimetres, apply scale with Ctrl+A, and check the dimensions in the N panel before exporting.
Is there a faster way than Blender?
If you already have the model and only need the mold, a mold generator such as Meshcast does the block, split, keys, spout and vents from sliders in about a minute, and repairs leaky files. Use Blender when you need to change the model itself.
Made by meshcast.app. Menu names are from Blender 4.x and can move between versions. Got stuck? Email a photo and I'll help you debug.