Adaptive silicone molds: use far less silicone
This guide was drafted with AI assistance.
The adaptive silicone mold maker builds a printable shell that hugs your model, so you fill a thin gap instead of a whole box. Print it, coat it in release, pour, cure fully, then split it open and peel the mold out.
What the generator does, and what it doesn't
Handled for you
- Grows a shell that follows the model at a silicone thickness you set, instead of boxing it
- Splits it into 2, 3 or 4 parts and places the split plane, with rotation and offset you can nudge
- Adds an easy-release draft per part and checks the result against your printer’s overhang limit
- Runs an air-trap and cast-release analysis, and adds the pour spout, tabs, clips and stand-fins
Still your call
- Built for solid figurines. For a hollow, open-top vessel like a vase or cup use vase mold instead, which adds an inner core
- More parts means more seams on the finished cast. Use the fewest the shape allows
- The shell hugs the model, so it saves silicone but is less forgiving of a badly oriented master than a plain box
If the generator refused your file, the message is explained here: why was my model rejected. Almost every rejection is the same thing, a mesh with holes, and the “Fix it for me” button in the popup resolves most of them in one click.
What a hugging shell is
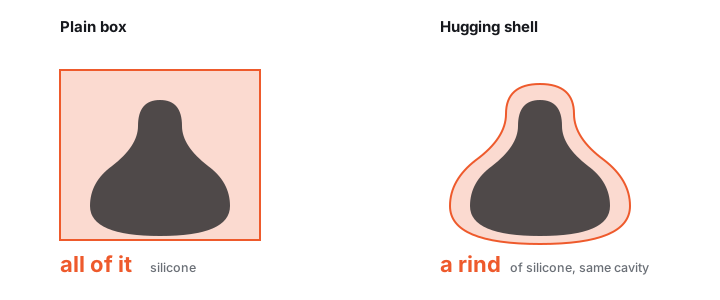
A box mold is a container: you pay for silicone in every empty corner. A hugging shell leaves only a thin gap to fill. You print a base plate, 2 to 4 wedges and spring clips, with a pouring funnel on top. The wedges split apart afterwards, so the shell lets go of the cured silicone instead of trapping it. For simple shapes the plain silicone mold generator is easier.
Make one in 3 steps
Generate the shell
Upload your model. Three settings matter:
| Setting | What to pick |
|---|---|
| Shell parts | 2 for most figures, 3 or 4 for wide or undercut shapes |
| Silicone thickness | 10 mm default, thinner saves material, thicker is sturdier |
| Split plane | Drag it through the widest part of the model |
Print the parts
Base plate flat, wedges upright on their feet: almost no supports needed. 0.2 mm layers, 3 walls, 15% infill, PLA or PETG. Print the clips too. The shell is only a housing, so fine layers are wasted.
Coat, pour and cure
Coat every surface silicone will touch with release. Seat the model on the base plate and clip the wedges around it. Mix by weight, then pour a thin stream through the funnel, tapping to bring bubbles up.
Curing and unclipping, in order
Leave it the full cure time on the datasheet, not the demold time, and longer in a cold room. Then unclip, split the wedges off one at a time and peel the mold away slowly.
Getting the silicone out
This is what goes wrong. Silicone cures inside every layer line and keys into the plastic, so always use a release agent: spray release, petroleum jelly, or soapy water left to dry. Add a few hours to the cure below 20 °C, take the wedges off before the model, and peel from one edge rather than pulling up.
Adaptive silicone troubleshooting
A shell part will not come off the cured silicone
Cause Either no release agent on the shell, or the split plane sits somewhere the shell has to stretch to leave, which a rigid print cannot do.
Fix Release every surface, the shell included, not just the master. If it still binds, rotate the split plane so it crosses the model at its widest point, or add a part. Each extra wedge only has to pull away from its own slice.
Rescue Warm water over the outside for a minute expands the shell faster than the silicone. Do not lever with metal; you will nick the shell and print the nick into every future mold.
The silicone did not reach the top, or there is a void inside
Cause Air trapped under an overhang. A hugging shell has far less headroom than a box, so the silicone has nowhere to push the air to.
Fix Orient the model so its highest point sits directly under the pour spout, and turn the air-trap analysis on before generating. Pour slowly enough that the level visibly rises rather than splashing.
Note The generator will warn you about a trap it can see, but it cannot see one you create by pouring too fast.
The seams show on every cast
Cause Silicone crept into the gap between shell parts, so the mold itself carries a ridge that then prints onto every cast.
Fix Tighten the fit clearance a little and clip the parts firmly before pouring. A wipe of petroleum jelly along the mating faces seals the last fraction of a millimetre without contaminating the pour.
Accept A faint line is normal on any multi-part mold. Trim it off the first cast with a blade and see whether it is actually worth chasing.
How much silicone does a hugging shell actually save?
A box fills every empty corner around your model. A hugging shell fills a jacket a few millimetres thick, which on a figurine is often a fraction of the silicone a box would need.
The saving grows with how un-boxy the shape is. A cube saves nothing; an outstretched figure saves a great deal. The page estimates the volume for your actual model before you print anything, so you can compare it against the box formwork for the same file.
Should I use 2, 3 or 4 shell parts?
Start at 2 and go up only when the shape forces you to.
2 parts The default, and right for most upright figures. Fewest seams, quickest to print and clip.
3 parts Wide models, or a limb sticking out sideways that a two-way split cannot clear.
4 parts Deep undercuts on more than one axis. Every extra part is another seam on the finished cast, so this is a last resort rather than a safety margin.
Can I reuse the printed shell?
Yes, and that is the point of it. Wash it, dry it, re-apply release and pour again. One printed shell makes the same mold as many times as you need.
Keep the master too. A silicone mold is the consumable here; the print and the master are not.
Holes and cavities in my model are not showing up
Cause The shell is grown from the model’s outer surface, so an interior void that never breaks that surface has nothing for the shell to follow. A recess that is narrower than the silicone thickness also gets bridged over rather than followed.
Fix Raise the detail setting, and reduce the silicone thickness so the shell can reach into a recess instead of spanning it. Orient the model so openings face outward rather than being tucked under it.
Reality check A hugging shell is not a cavity-capture tool. If the interior detail is the point of the piece, a box formwork pours silicone into every void instead of shrink-wrapping the outside, and that is the right tool for it.
Half the shell is cut off
Known issue Reported and not yet reproduced, so it is an open bug. It is not something you have configured wrongly.
Try Reset split angle and split offset to their defaults, since an extreme rotation can put the split where the shell has nothing to hold. Then check the upload is a single object, not a slicer project file.
Help fix it Send the original STL plus Scale, Shrink %, Gap, Wall, Split angle, Split offset, part count and the easy-release toggle. Why each one matters.
Can I print the figure separately from its base?
Yes. Advanced → Master → Separate + key.
Fused to base The default. The figure is welded into the base and prints as one piece.
Separate + key The figure ships as its own part with anti-rotation locating pegs into sockets in the base, so you can print it on its own, in resin for the detail while the base stays in cheap PLA, and key the two together afterwards.
A long thin mold sags or bows while the silicone cures
Cause Nothing is holding it. A tall narrow shell has very little footprint, and a litre of uncured silicone is heavier than it looks.
Fix Brace it externally rather than redesigning it. Stand the shell in a container of dry rice or sand, which supports it on every side at once, or clamp it between two offcuts of scrap board.
Note People building candle molds have been modelling a support skeleton in CAD just to hold the shell upright. A box of rice does the same job in ten seconds, and it adapts to the next shape too.
Made by meshcast.app. Got stuck? Email a photo and I'll help you debug.