How to make a custom paper embosser
This guide was drafted with AI assistance.
Type your text (or upload a logo) in the embosser generator, pick a hinge or magnet closure, and print the plates flat in PLA at 0.12 to 0.16 mm. Then squeeze 160-300 gsm cardstock between them for a few seconds.
What the generator does, and what it doesn't
Handled for you
- Builds the male and female dies as a matched pair, mirroring the female so they mesh
- Adds either a print-in-place three-knuckle hinge or magnet pockets, and checks the hinge for collisions
- Works from text or from a PNG, JPG or SVG
Still your call
- It embosses paper, it does not print ink. For ink you want the stamp maker
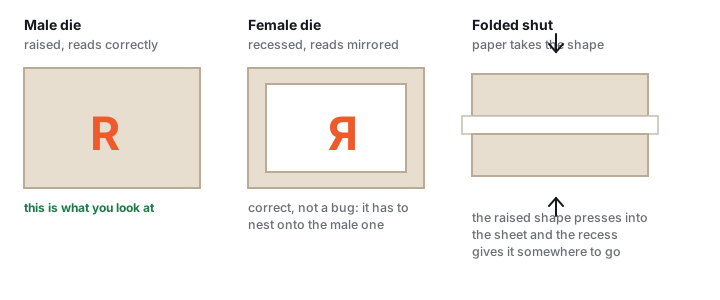
- The male die reads correct and the female is mirrored. That is how a matched pair has to work
- Thick card needs more force than a printed hinge comfortably gives
If the generator refused your file, the message is explained here: why was my model rejected. Almost every rejection is the same thing, a mesh with holes, and the “Fix it for me” button in the popup resolves most of them in one click.
How an embosser works
An embosser is a matched pair of plates. The male die carries the design raised up, the female die has the same shape cut in as a cavity. Squeeze paper between them and it stretches into the cavity and stays there. No ink, just texture you can feel, which is why it suits invites and business cards. For ink, use the 3D-printed stamp guide instead.
Make one in 3 steps
Design your plates
Type up to two lines of text, or upload a PNG, JPG or SVG logo. Set the plate Width and Height (50-60 mm square is a good start) and the design Scale. Bold shapes emboss far better than hairline strokes. Leave Emboss depth at 1 mm and Paper gap at 0.25 mm. Then pick a closure: Hinge prints both plates as one foldable part, Magnets gives two loose plates with pockets for neodymium discs.
Print flat, no supports
Print exactly as oriented, flat on the bed. Use 0.12 to 0.16 mm layers, 3 to 4 perimeters and 40% or more infill so the plates do not flex. PLA is stiffer than PETG, which is what matters here. Flex a printed hinge a few times to free the pin.
Emboss the paper
Slide 160-300 gsm cardstock in, line up the design, and squeeze hard for 2 to 3 seconds. Hands work, a vice or G-clamp gives a deeper mark. Test on scrap first.
Fix a weak or messy impression
| Symptom | Fix |
|---|---|
| Very faint mark | Use a vice or clamp, hold longer, try slightly damp paper |
| Paper tears | Lower the emboss depth, or move to heavier cardstock |
Embosser troubleshooting
The impression is faint or uneven
Cause Not enough force, or paper that is fighting you. A printed hinge can only deliver so much pressure before it flexes.
Fix Use 160 to 300 gsm cardstock, mist it lightly first so the fibres move, and squeeze in a bench vice or under a book rather than by hand. Hold for a few seconds instead of a quick press.
If it persists Deepen the relief in the model. Very fine line work embosses poorly at any pressure because the paper simply bridges it.
The two plates do not line up
Cause A print-in-place hinge that fused, or a magnet pocket that is a fraction off, so the pair closes at an angle.
Fix Flex the hinge free before the first use; the knuckles are meant to break apart on the first movement. For magnets, check both sit flush in their pockets and that you have not glued one in proud.
The paper tears
Cause Too much force for the paper, or a design with sharp internal corners that act like a cutting edge.
Fix Step down to lighter pressure and heavier paper, and round the sharp corners in the artwork. Misting the paper helps here too: damp fibres stretch, dry fibres tear.
Why does the female plate read backwards?
That is correct, not a bug, and it is the single most reported non-problem on this tool.
The male plate carries the raised design and reads the right way round. The female has to nest onto it when you fold the pair shut, so its cavity must be its mirror. If both read the same way they would not mesh at all.
Is this the same as a rubber stamp?
No. A stamp puts ink on paper. An embosser squeezes the paper between two matched plates into a raised, ink-free shape you can feel.
If you want ink, use the stamp maker instead. If you want both, they are separate tools and separate objects.
What paper works best?
160 to 300 gsm cardstock. Below that it tears; much above it and a printed press cannot move the fibres.
Trick Lightly misting the sheet first gives a noticeably deeper, sharper impression, because damp paper fibres take a new shape and hold it as they dry.
Made by meshcast.app. Got stuck? Email a photo and I'll help you debug.