How to mold a hollow vase or planter
This guide was drafted with AI assistance.
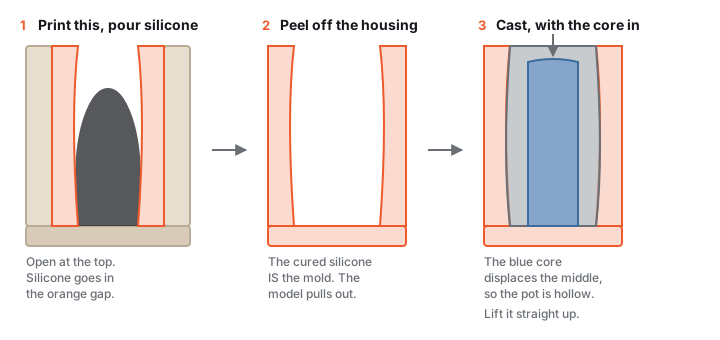
The vase mold generator does not print a mold. It prints the formwork you pour silicone into, plus an inner core. You print the parts, cast a silicone mold from them, then cast your pot into that silicone with the core dropped in so the middle stays hollow. Two casts, and the core is what makes it a pot rather than a lump.
What the tool does, and what it doesn't
Handled for you
- Wraps your vessel in a two-piece rigid housing sized for the silicone wall you asked for, with seam pins and a threaded clamp
- Fuses your model to its own base plate, so it cannot shift or float while the silicone cures around it
- Builds the inner core that hollows the cast, sized automatically from your vessel's own profile
- Tells you how much silicone to mix, in millilitres and grams, before you print anything
- Warns you before generating if the shape will not release, or is too short or too flat to work at all
Still your call
- Buying and mixing the silicone. It is the expensive part, so read the volume estimate first
- Keeping the core from floating while the cast sets. Weight it
- Round and open-topped only. Handles, spouts and lids need a different tool
If the generator refused your file, the reason is explained here: why was my model rejected. Most rejections are a mesh with holes in it, and the “Fix it for me” button clears those in one click.
Why there are two casts
This is the part that trips people up, so it is worth being blunt about it. Nothing you print is the mold. What you print is a rigid box with your model standing inside it, and a gap between the two. You fill that gap with silicone. When the silicone cures you take the printed box apart and throw nothing away, because the silicone is now the mold, and it is the thing you cast concrete into.
The reason to go the long way round is that concrete and plaster will not release from a rigid printed mold, and a pot has exactly the shape that makes that worst: tall, straight-sided, and gripping along its whole length. Silicone peels off. It also survives dozens of casts, so the printing is a one-off cost.
What you get
| Part | What it is for |
|---|---|
| Base plate + model | Your vessel, fused to the plate it stands on. One piece on purpose, so it cannot move while the silicone cures. |
| Housing A and B | The two rigid halves that form a cylinder around the model. They split on one flat plane and index on seam pins. |
| Clamp | A threaded yoke and thumbscrew that lock the halves together across the top and hold the core centred later. Not included on narrow-mouthed vessels, see the FAQ. |
| Core | The plug that displaces the middle of the cast. This is what makes the finished piece hollow. |
| Silicone saver (optional) | Only when you switch the insert on, and only on shapes it can help. A cone that fills space in the housing so you mix less silicone. See using less silicone. |
Make one in 5 steps
Generate the formwork
Upload a round, open-topped vessel, or load one of the examples. Check the upright axis first: the pot has to be standing, not lying down, and most files come out of CAD Z-up. Leave the inner core on Auto-fit unless you have a reason not to, then generate.
Print everything
0.2 mm, 3 walls, 15% infill for the housing. PLA is fine, the housing is used once per mold and only has to hold liquid silicone. Print the core denser, 4 walls and 30% or more, because wet concrete pushes on it hard and a hollow core will also want to float.
Assemble and pour the silicone
Stand the two housing halves on the base plate, line up the seam pins, and screw the clamp down on top. Brush a thin coat of release onto the printed model. Mix the silicone, pour it slowly into the open top in a thin stream from a height, and let it fill the gap until it reaches the rim. Leave it to cure fully, which usually means overnight.
Release the silicone mold
Undo the clamp, take the two halves off, and pull the printed model straight up out of the cured silicone. You now have a flexible negative of the outside of your vessel, open at the rim. Keep the housing halves: they make a useful outer jacket to stop the silicone bulging when you cast something heavy.
Cast the pot
Pour your concrete, plaster, wax or resin into the silicone. Then lower the core in, so the material rises around it rather than having to squeeze underneath it. Weight the core or fit the clamp so it cannot float, and check the mold is standing level. Once set, lift the core straight up, then peel the silicone back off the cast.
Settings that matter
| Setting | What it changes |
|---|---|
| Upright axis | Which way is up. Get this wrong and a standing pot reads as a flat dish and gets rejected. Check it first. |
| Auto-fit core | On by default and usually right: the core is derived from your vessel's own inside profile. Switch it off only if you want a specific wall thickness. |
| Minimum wall thickness | Only applies when you upload a solid model. It is how much wall to leave when the tool hollows it out. An already-hollow vessel keeps its own walls and ignores this. |
| Silicone wall thickness | How thick the rubber is, from 6 mm up, 12 mm by default. Thicker holds its shape better under heavy concrete; thinner costs less and peels more easily. Under 8 mm the page warns you what that costs, but never blocks it. |
| Core safety gap | The clearance between the core and the mold wall, which is the wall thickness of your finished pot. Raise it for concrete, which needs bulk to be strong. |
| Casting shrinkage | Scales the whole thing up to compensate for a material that shrinks as it cures. Leave it at 0 for concrete and plaster; it is there for clay and some resins. |
Using less silicone
Silicone is the expensive part of this whole process, so it is worth understanding where it goes. By default the housing is a plain cylinder, sized to your model's widest point. Anywhere your vessel is narrower than that, silicone cures in empty space and does nothing. On a shape that tapers a lot, that is most of what you paid for.
Two controls fix it, and the tool offers both rather than picking for you, because they suit different shapes.
| Option | What it does | Use it when |
|---|---|---|
| Form-following walls | The housing bore follows your model's silhouette instead of being a straight tube, so there is no wasted gap to begin with. The halves come apart sideways. | Almost always. It works on any round vessel, including a pot or planter that gets wider as it goes up. |
| Silicone saver insert | A printed cone that drops into the plain cylindrical bore and lifts straight back out, filling the space that would otherwise be silicone. | Only where your model gets narrower toward the rim: a vase neck, a bottle shoulder. |
If the saver reports that it cannot help, that is a real answer, not a failure. The insert has to leave along one axis, so on a pot or a planter, which is widest at the rim, no such part exists at any cone angle. The badge tells you rather than shipping a piece that would lock in the housing. Use form-following walls on those shapes instead.
Two extra settings appear once the insert is on. Saver cone angle trades saving against release: 0° saves the most and relies on the silicone flexing as the cone comes out, while a higher angle lifts out more easily and thickens the mold near the rim. Saver fit clearance is just the gap to the housing bore, to raise if the insert will not drop in.
Shapes that work, and shapes that don't
Everything here follows from one fact: the printed model has to pull straight up out of the cured silicone, and later the core has to pull straight up out of the cast.
- Best: a straight-sided or gently tapered pot, widest at the rim. Nothing grips on the way out.
- Fine: a gentle belly, or surface texture and fluting. Silicone stretches over these. The page will warn you, and the warning is a heads-up rather than a refusal.
- Poor: a vessel that necks in sharply at the top. It will mold, but the core has to fit through the mouth, so it collapses to about mouth diameter and saves you very little material inside.
- Not this tool: handles, spouts, lids, or anything that is not roughly round. A handle is a closed loop and no single flat parting plane can release it. Use the adaptive silicone mold.
- Not this tool: anything under 15 mm tall, or more than about twice as wide as it is tall. Use the silicone mold generator, which is built for small and flat pieces.
Troubleshooting
My cast came out solid instead of hollow
Cause The core was left out. The silicone is a negative of the outside of your vessel only, so on its own it casts a solid lump shaped like a pot.
Fix The printed core is what makes the inside. Pour the cast material first, then lower the core in.
Watch out A light core floats up out of wet concrete and plaster. Weight it, or fit the threaded clamp.
The core came out tiny and there is no clamp in my download
This is correct behaviour on a vessel that narrows towards the top, not a sizing bug.
Why The core has to pull straight up out of the finished cast, so it can never be wider than the mouth. A wide belly behind a narrow neck is an undercut, and no rigid core can reproduce it.
Why no clamp Under about 15 mm across there is no room left for the retaining screw without breaching the core's roof, so the yoke and thumbscrew are dropped rather than shipped broken. Place that core by hand and weight it. The housing halves are still held by their wing clamps and seam pins, so nothing has come unclamped.
It says my model is too short, or not vase-like
Two separate pre-flight checks, both run before you spend a generation.
Too short Under 15 mm tall, which leaves no room for a housing wall and a silicone wall.
Not vase-like Wider than it is tall by more than about 2 to 1, so it is a dish rather than a vessel.
Check first The upright axis. A pot lying on its side measures as flat and wide, and switching the axis clears the flag on its own.
If it really is flat Use the silicone mold generator instead.
The model will not come out of the cured silicone
Cause Something on the model is wider below the rim than at it, so it grips on the way up. The page flags this before you generate with an undercut notice in the top-left corner of the preview.
Fix Mold release on the printed model, every time. Layer lines hold on to silicone far more than a smooth surface does.
Limit Silicone stretches over a gentle belly, but a sharp lip or a deep groove will tear it. Shapes widest at the rim release best.
The walls of my cast came out uneven
Cause The core drifted while the cast set. It is floating in wet material with nothing centring it except the clamp.
Fix Fit the clamp if your download included one, weight the core, and stand the mold somewhere level.
Also Raising the core safety gap thickens the wall, which makes a small drift much less visible.
How much silicone will I need?
The page tells you as soon as a model loads, in millilitres and grams, calculated from the real gap between your model and the housing wall.
First, use less space Switch the formwork walls to Form-following, or turn on the silicone saver insert. See using less silicone below: a straight housing is a cylinder sized to your model's widest point, so every millimetre narrower than that is silicone curing in empty space.
Then, use thinner Lower the silicone wall thickness in Advanced settings. It goes down to 6 mm; 12 mm is the default and is right for most pots. Under 8 mm the page tells you what you are trading away.
The silicone saver says it cannot help with my shape
Correct behaviour on a pot or planter, not a failure.
Why The insert drops into the housing and lifts straight back out, so it can only reach a stretch that gets narrower toward the rim, like a vase neck or a bottle shoulder. A vessel that is widest at the rim leaves no such shape at any cone angle, so the tool says so rather than shipping a piece that would lock in the housing.
Instead Switch the formwork walls to Form-following. That works on any round vessel and saves the same space.
Can I do a mug with a handle, or a spout?
No. The housing is a cylinder that splits on one flat plane, and a handle is a closed loop that locks the mold wherever that plane goes.
Instead Use the adaptive silicone mold, whose shell hugs the shape and splits into more pieces.
Do I have to print the model itself?
Yes, and it is already in your download, fused to its base plate as a single part.
Do not split them That fusion is what stops the model shifting or floating while the silicone cures around it.
Can I reuse the printed parts?
Yes. The housing, base plate and clamp are formwork, so they survive the pour and can make the same mold again.
Keep them The two housing halves double as an outer jacket that stops the silicone bulging when you cast something heavy.
Made by meshcast.app. Got stuck? Email a photo and I'll help you debug.