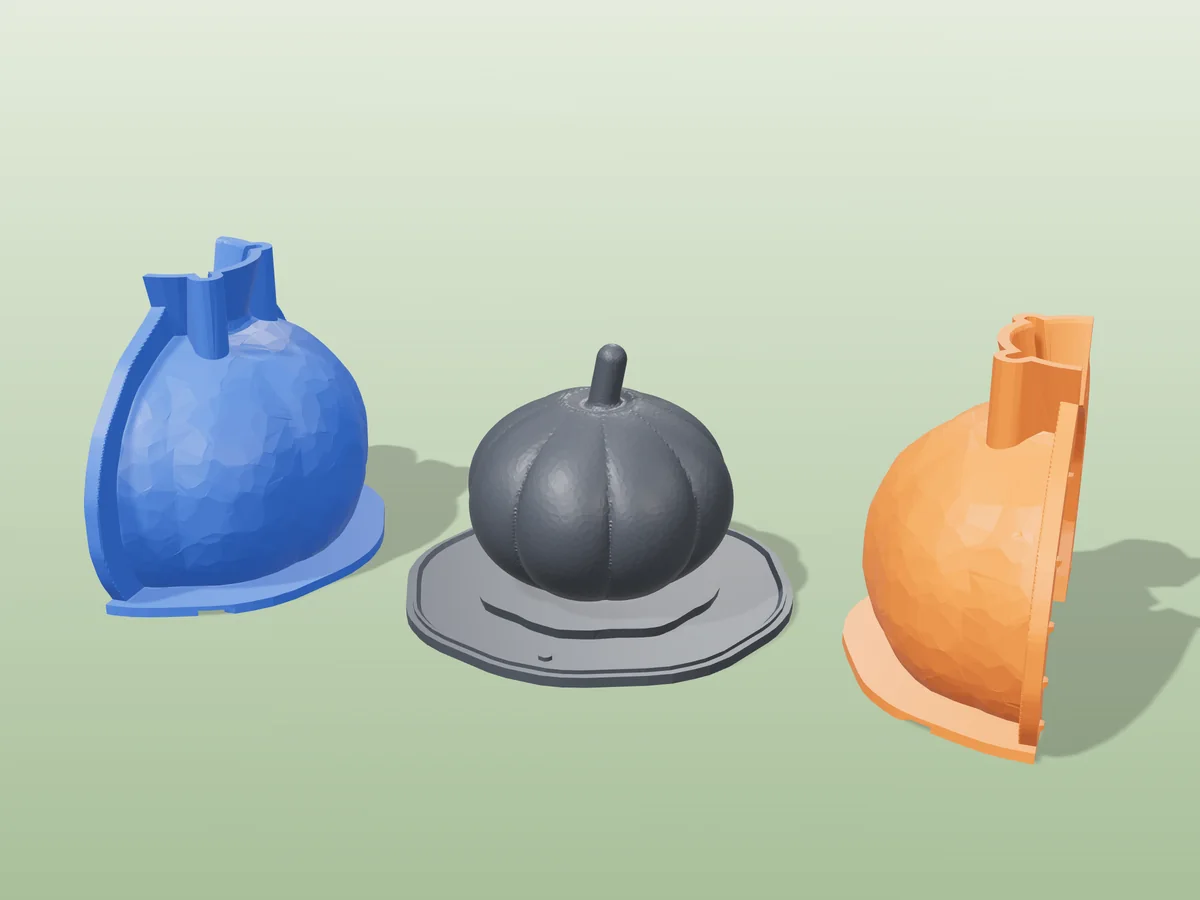
A pumpkin candle 76 mm across and 70 mm tall to the tip of its stem: eight rounded lobes, a sunken crown and a short curved stem that the wick runs up through.
Made with the hugging-shell mode of our silicone mold maker. The body swells out above its foot all the way round, an undercut no rigid split can release, so you print the base with the pumpkin fused onto it and a two-part shell, pour about 214 ml of silicone, and cast in the flexible mold that comes out.
Cast them in cream, burnt orange and sage for an autumn table, or in white with a gold stem for a wedding. The zip carries every printed part, the pumpkin master as its own STL, the tool's own print-settings sheet and a recipe file for the generator.
Shown as a 3D render of the printed mold parts pulled apart around the master, not a photo.
What you need
- About 240 ml of silicone (mix it in one batch)
- About 162 g of pillar wax per candle: each cast is 180 ml
- Steel binder clips, tape or a hot glue gun
- A primed wick about 100 mm long, threaded through the stem
How to cast it
- Print the base, which has the master already fused onto it, and the two shell halves. No supports.
- Stand the shell halves on the base around the master and hold the seams shut with steel binder clips. The seats for them are built into the shell.
- Tape the outside seams or run a bead of hot glue along them, because silicone finds every gap.
- Mix 240 ml of silicone in one batch, pour it into the open top in a thin stream, and fill level with the rim.
- Once it has cured, unclip the shell, lift it off and peel the silicone off the master. That silicone is your mold.
- Set the silicone back in the shell to keep its shape, and cast into it through the opening the base left.
| Cast material | Candle wax |
|---|---|
| Total print time | 17 h 45 min |
| Printed parts | 3 |
| Size (W x D x H) | 115 x 115 x 91 mm |
| Filament | ~214 g |
| Layer height | 0.2 mm |
| Infill | 15% |
| Supports | Not needed |
| Printer | Sliced with PrusaSlicer 2.7.2: 0.4 mm nozzle, 0.2 mm layers, 3 walls, 15% infill, MK3-class speeds. These parts only hold liquid silicone while it cures, so PLA is fine. No supports. |
| Download | ZIP: 3 printed parts (STL) + candle master (STL) + print sheet + recipe |
| Added | 2026-09-24 |
Pro early access until October 24, 2026, then free with any account.
Free for personal use. Selling the pieces you cast needs a commercial licence (Pro or Founder); passing on the file itself is not permitted on any plan. Full terms.
Made with the free silicone mold maker generator. Upload your own model and get the same kind of mold built around it, in your browser.
New to casting? Read the silicone mold maker guide.